
How to Crochet an Infinity Cowl

This is a short photo tutorial showing the basics of how to crochet an infinity cowl. It is very easy, but it can be a bit confusing if you’ve never crocheted one before.
The hardest part about crocheting an infinity cowl is joining the chains properly and working the first few rounds. Once the first few rounds are done, you can sit back and relax as you finish the cowl.
For this tutorial I used my Cross-Over Long DC Cowl pattern, but the principle works basically the same for any cowl. I put this together because the instructions for the cowl are not clear enough. Let me know if you still run into problems or if you need additional pictures and I’ll be happy to improve this tutorial.
(Also, please don’t use the colors of my stitch markers as a guide. I had to go back and redo a few images and didn’t realize I had used different colored beads in the markers.)
Instructions
Step #1:
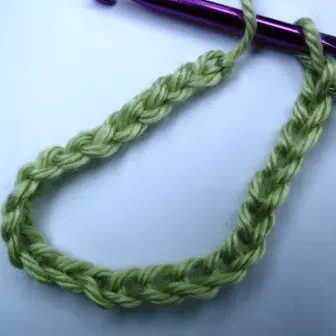
Make your chains – as many as the pattern says. Notice the different sides of the chains. Here you see the right side, also referred to as the top of the chains. If you hold your work up you will notice that each chain creates a small “V”.

This is the wrong side, also referred to as the back side. What you see here are the back loops, also referred to as the back bumps.

Step #2:
Place a stitch marker in the back bump of the last chain made. This helps to take the guesswork out later as it can be difficult to see where the last stitch needs to be made.

Step #3:
Lay the chains flat on a table so that all the Vs are facing up. Then take the tail end and twist it so that the back bumps are sticking up. So on one side here you see the Vs and on the other you see the back bumps. This is referred to as half a twist.
Step #4:
Now join the chains with a slip stitch in the back bump of the first chain. This causes the half twist to remain.

Join with slip stitch in back bump of first chain made. (Join completed)

Step #5:
Chain 1.
Single crochet into the same back bump as where you made the join. To help take the guesswork out for later, mark the top of the first stitch as well as the free loop at the bottom of the stitch. (You will work into these free loops for the second part of the first round, which in some patterns may be referred to as the second round. For this tutorial I’m going to refer to it as the second part of the first round.)

You can use different markers if you like, but notice the tail-end sticking out at the bottom. For the second part of this round this tail end will face up as you begin to work into the free loops.

Step #6:
Continue to single crochet into all the back bumps. The first image below shows the black stitch marker in last back bump (chain) that needs to be crocheted into. The second image shows the round (or first half of the round) completed. You’ll see the joining slip stitch in between the stitch markers – Do Not work into that stitch.

Also, notice how the tail end is now facing up. If it’s not, untwist or twist your work so that it is while at the same time making sure that you have half a twist in the circle.

Step #7:
Here is a more detailed view. For the second part of round 1, begin working into the first Free Loop where the stitch marker is.

Below is a Re-Cap of the second part of Rnd 1 – I used single crochets, but the principle works the same with any other stitch the pattern calls for.

Special Instructions for the Cross-Over Long DC Cowl
For this tutorial I used my Cross-Over Long DC Cowl pattern, which requires you to skip the first free loop and begin to crochet into the second loop. For this pattern, work the first 3 stitches as instructed.


Then come back and work the cross-over long dc into the skipped stitch (free loop).

Continue to crochet around working into all the free loops. In the image below I’ve crocheted around and am ready to begin crocheting into the very first single crochet that was made in step #5.

It looks like you still have more stitches that need working into but thanks to your stitch markers you know that you have worked into all the stitches. Here is a more detailed image of what the stitch illusions really are:
For some patterns you might need to make a join here. But for this pattern I crocheted directly into the first stitch. This way you can sit back and crochet mindlessly until the cowl is complete without having to join any rounds.

Although it seems like you crocheted two rounds, technically you only crocheted one because in an infinity cowl one round goes around both the top and bottom.
Continue to work around on both sides of the cowl until you have reached a desired height or as the pattern instructs.

Now you know the basics of how to crochet an infinity cowl. The above cowl pattern can be found here: Cross-Over Long DC Cowl


