
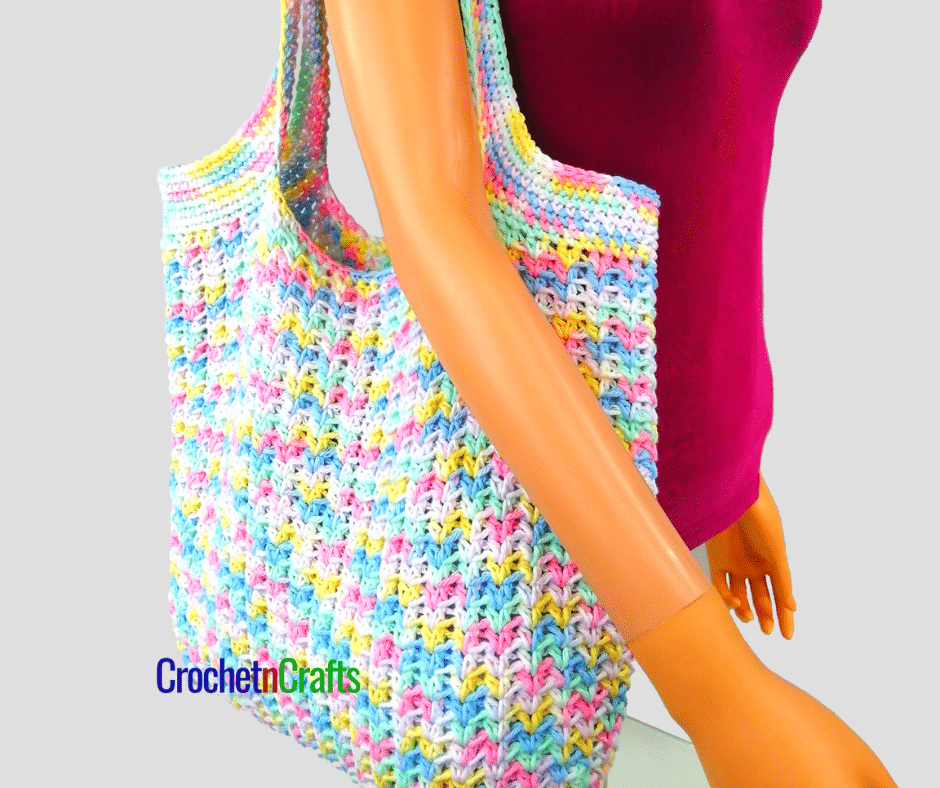
Pretty Simple Bag Pattern

This simple bag pattern is not only pretty, but it’s also an easy and mindless pattern to crochet. Although very simple, this crochet bag has a nice texture that you’ll enjoy showing off. It is a great gift idea for mom or any girlfriend who loves her bags.
This bag works up pretty quickly and easily and is perfect for the summer or any other season. I reworked this in a variegated cotton yarn. It’s nice and roomy, making it perfect for day trips to get groceries or whenever you need to take a lot of stuff with you.


Subscribe for Free Crochet Patterns, Coupons, and Other Crafty Promotions.
You will also receive a PDF copy of the Beads and Diamonds Purse pattern.
Your email will not be shared. Unsubscribe any time. By subscribing, you agree to our privacy policy and terms of use.
Pretty Simple Bag Pattern Information
This simple crochet bag features a simple, yet pretty texture across the fabric.
Skill Level: Easy
The Construction
This bag is crocheted from the bottom up, and in one piece. Once crocheted you have the option to insert a liner as well as a zipper to make it extra strong.
The Bottom. The bottom is worked with single crochets because that is one of the most solid stitches in crochet. Instead of working the bottom in rows, I like to work it in rounds by starting off with a long chain and then crocheting around both sides of that. Here is a tutorial: Working on Opposite Side of Chain
You can increase or decrease the size of your bag simply by doing more or less repeats of the single crochet rounds.
The Body. The body is worked with half double crochets. You work two half double crochets into one stitch, skip a stitch and then work another two half double crochets into the next stitch. So it’s almost like a hdc v-stitch, but without a chain space within the V. Below are a few images to help.


The Strap. The handles are worked in one piece with the bag. It is very straightforward, but if you made adjustments to the size, or if you just need a visual, here is a tutorial that you can use on any bag: How to Make Crochet Bag Handles
Lining Your Bag
Last, but not least, you’ll want to line your crochet bag. This extra step is optional, but it can help to strengthen the bag and also make it look more professional. A sewing machine is helpful, but if you don’t have one, you can sew the seams by hand as well. The seams will go on the inside of the bag, so if they don’t look professional, that’s perfectly okay as no one will see them. :)
Here is a tutorial on how to line your bag: Lining Your Crochet Bags. The tutorial also shows how to add pockets and a zipper.
Materials
- Yarn: Bernat Handicrafter Cotton (Worsted Weight, #4; 100% Cotton; 340g/12oz; 556m/608yds) Color: Pretty Pastels, 1 ball
- Crochet Hook: H/8-5.00mm
- Other: Measuring Tape, Scissors, Yarn Needle, Stitch Markers.
Measurements
- Gauge: 12 hdc sts = 4″.
- Finished Size: 16″ wide by 14″ high, not counting the handles.
Abbreviations
- Ch/Chs = Chain/Chains
- FO = Fasten Off
- Hdc = Half Double Crochet
- Hk = Hook
- Lp/Lps = Loop/Loops
- Rep = Repeat
- Sc = Single Crochet
- Sk = Skip
- Sl St = Slip Stitch
- Sp/Sps = Space/Spaces
- St/Sts = Stitch/Stitches
Pretty Simple Bag Crochet Pattern Instructions
Rnd 1: Ch 28, sc in 2nd ch from hk and into next 25 chs, 3 sc in last ch. Working on opposite side of starting chs, sc in free lps of next 25 chs, 2 sc in last ch; join with sl st in first sc. [56 sts]
Rnd 2: Ch 1, 3 sc in same st as join, *sc in next 25 sts, 3 sc in next st, sc in next st*, 3 sc in next st; rep from * to * once; join with sl st in first sc. [64 sts]
Rnd 3: Ch 1, sc in same st as join, *3 sc in next st, sc in next 27 sts, 3 sc in next st*, sc in next 3 sts; rep from * to * once, then sc in last 2 sts; join with sl st in first sc. [72 sts]
Rnd 4: Ch 1, sc in same st as join and into next st, *3 sc in next st, sc in next 29 sts, 3 sc in next st*, sc in next 5 sts; rep from * to * once, then sc in last 3 sts; join with sl st in first sc. [80 sts]
Rnd 5: Ch 1, sc in same st as join and into next 2 sts, *3 sc in next st, sc in next 31 sts, 3 sc in next st*, sc in next 7 sts; rep from * to * once, then sc in last 4 sts; join with sl st in first sc. [88 sts]
Rnd 6: Ch 1, sc in same st as join and into next 3 sts, *3 sc in next st, sc in next 33 sts, 3 sc in next st*, sc in next 9 sts; rep from * to * once, then sc in last 5 sts; join with sl st in first sc. [96 sts]
Rnd 7: Ch 1, sc in same st as join and into each st around; join with sl st in first sc. [96 sts]
Rnd 8: Ch 1, 2 hdc in same st as join, *sk next st, 2 hdc in next st; rep from * around; sk last st; join with sl st in first hdc. [96 hdc]
Rnd 9: Ch 1, sk the st where you made the join; work 2 hdc in sp before next hdc, *sk next 2 hdc, 2 hdc in sp before next hdc; rep from * around; join with sl st in first hdc.
Rnds 10-40: Rep rnd 9.
Rnd 41: Ch 1, sc in same st as join and into each st around; join with sl st in first sc. [96 sts]
Handles
Lay the bag flat to place your markers for the handles. Count over 14 sts on the sides of the bag and place stitch marker in 15th stitch. This leaves 20 sts marked off in the middle. Do the same on the other side. Stitch markers should align on each side of the bag. Do not crochet into the 20 stitches in the middle.
Rnd 42: Ch 1, sc in same st as join and into each st up to marked st, *loosely ch 60 (or any number depending on how long or short you want the handles), sk the 20 sts marked off in the middle*, sc in next 28 sts; rep from * to * once; then sc in remaining sts; join with sl st in first sc. [56 sts and 120 chs]
Note: Work into the back bumps of the chs to keep things looking the same on both sides of the handle.
Rnd 43: Ch 1, sc in same st as join and into each st and into each ch around; join with sl st in first sc. [176 sts]
Rnds 44-47: Ch 1, sc in same st as join and into each st around; join with sl st in first sc. Fasten Off at last rnd. [176 sts]


Hello Ilove this bag. how to put linning of this white bag. i love it.
i have one more question ,do you sell these bags.
please let me know
thanks
A tutorial on how to line a bag is here: https://crochetncrafts.com/lining-a-crochet-purse/
And no, I don’t sell these bags, but you are free to sell anything you make from my patterns. :)
I made my base bigger and my stitch count is correct. But I’m a few rows into the HDC and I’m getting a few ruffles. Is that normal? Also, is this bag stretchy? I made my D a market bag that was way too stretchy so she doesn’t use it so I was looking for more structure. But now I’m wondering if the HDC rows will stretch too much as well?
Hi Kathy, Could you send a picture to rhelena @ crochetncrafts.com ? It’s hard to say without seeing it. My bag has a slight slouch to it, so a bit of flare might be okay. I find my single crochet stitches are always a bit tighter than the taller stitches, hence the reason for my slouched look.
The bag will stretch if you don’t line it, but it is hard to say by how much.