
Cross-Over Long DC Free Crochet Newsboy Hat Pattern

This free crochet newsboy hat pattern is perfect for sunny, yet cold days. Whether it be fall, winter, or spring, this newsboy is the perfect hat that can give you the protection you need from both the cold and the sun!
In the cooler weather, this is all you need, but in the bitter cold winter weather, you can easily slip a hood over this hat for extra warmth.
It is a very basic hat design, and you have the choice of making this with or without a brim. Simply choose your color and add your favorite embellishments and you’re all set for keeping warm.
Regardless of how you make it, this nifty newsboy hat will make for a great gift idea for birthdays and Christmas holidays.


Finished Sizes
The pattern has been updated to include multiple sizes including sizes for a doll size, preemie, 0-3 months, 6-12 months and small adult. If you need additional sizes for toddler and children, see the sizing notes.
This Crochet Hat Size Chart by Age can also be helpful in determining how big to make the crown for a particular size. Please note that this is a cap, so you don’t want too much negative ease because that will cause the brim to overstretch.

The Yarn
Originally this hat pattern was given in one size only using Patons Canadiana. Although it worked great, I found that the Astra was more along the same weight as a lot of baby yarns. And since I added the baby sizes I figured the Astra might make it easier for those who crochet a lot for babies.

The Stitch Pattern Used to Make this Newsboy Hat
This is an intermediate pattern.
The hat is started at the crown with single crochet stitches until the diameter is the size that you want.
The body, or the sides, of the hat is worked with the cross-over long double crochet stitch. It’s a basic cable stitch that is worked by skipping a stitch, then working three half double crochet stitches. Then to make the cable, work a long double crochet stitch into the skipped stitch. This brings the long double crochet diagonally over the half double crochets for a beautiful texture!
A Few Images to Help with the Cross-Over Long DC Rounds.

Mark last stitch of last rnd – this is where you will work your first cross-over long dc into.
You might also want to mark the first stitch in the next round. That way you know exactly where to join.

First Cross-Over Long DC Made

Skip Next Stitch, Hdc in Next 3 Sts.

Second Cross-Over Long Dc Made.

This is what it looks like once completed. Only thing left is to join it with a slip stitch in the marked hdc.

But before you join, move the stitch marker up into the last stitch made.

Join and make your first stitch. Move the stitch marker up. Continue moving the markers up to help you see clearly where to join and work the stitches.

Other Patterns with The Cross Over Long DC
- Cross-Over Long DC Cowl
- Cross-Over Long DC Fingerless Gloves Pattern
- Crochet Cell Phone Holder and Coin Purse
- Cross-Over Long DC Purse
- Cross-Over Long DC Crochet Baby Blanket
The Brim
The brim is worked directly onto the hat. It is worked in rows, with increases made in each row in order to create the rounded look. The increases are made within the rows, as well as at the end of the rows by picking up more stiches along the hat band.
It looks okay as it is, but for a sturdier brim you could add a lining underneath to help keep the shape better. For a cleaner look, you can use a permanent fabric stiffener along the brim. If you decide not to stiffen or line it you will need to block it after each washing.
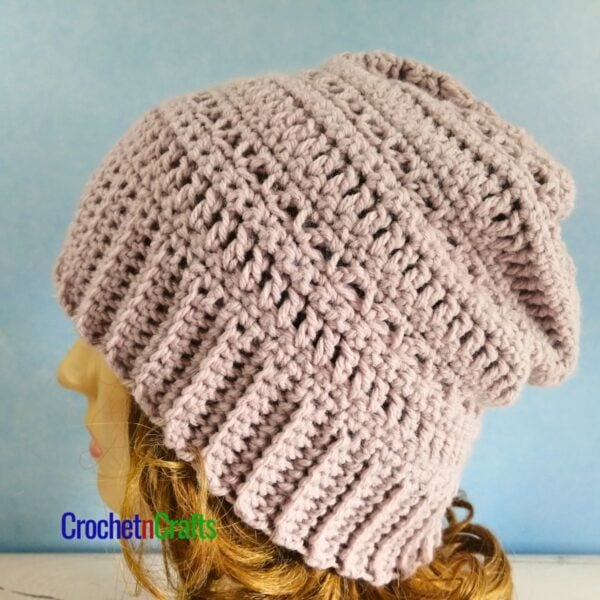
And if you don’t like the brim, you could omit it and have yourself a nice beanie hat to keep you cozy.


Cross-Over Long DC Free Crochet Newsboy Hat Pattern
Skill Level
Materials
- Yarn: Patons Astra (Light, #3; 100% acrylic; 50g/1.75oz; 147m/161yds) 1, (1, 1, 1, 1, 2) balls. For the adult size I had about 30" left of the first ball. Depending on how you crochet, you might need one or two balls.
- Crochet Hook: 4.50mm
- Other: Measuring Tape, Scissors, Yarn Needle, Stitch Markers.
Measurements
- Gauge: 2.75" over first 6 rounds"
- Finished Sizes: Doll, Preemie, 0-3 months, 6-12 months, and Adult XS
Abbreviations
- RS = Right Side
- Bpsc = Back Post Single Crochet
- Ch/Chs = Chain/Chains
- Dc = Double Crochet
- FO = Fasten Off
- Hdc = Half Double Crochet
- Lp/Lps = Loop/Loops
- Rep = Repeat
- Rnd/Rnds = Round/Rounds
- Sc = Single Crochet
- Sc2tog = Single Crochet 2 Stitches Together
- Sk = Skip
- Sl St = Slip Stitch
- St/Sts = Stitch/Stitches
- YO = Yarn Over
Special Stitch Instructions
- Cross-Over Long DC Yarn over and insert the hook from front to back into designated stitch. Yarn over and pull through. You should have three loops on your hook. Yarn over and pull through first two loops. Yarn over and pull through last two loops. Cross-Over Long DC
Notes
-
Take measurements or use this size chart as a reference. - When adjusting the size for a billed cap, make the hat circumference the same size as head circumference. The cap allows for some stretch, but too much stretch will cause the bill to sit flat against the forehead.
- You can also make this without the bill, in which case you can allow for more stretch.
- The circumference size is increased at every even numbered round, as each even numbered round ends in a multiple of four, which is the multiple you need for the stitch pattern. If you need to stop your increases at an uneven number for a slightly different size, you can increase this last round by either 4 or 8 stitches.
- Hat height as given in pattern should fit approximately just below the ear. It is increased by about 0.5" with each Crossover Long DC Round. You can decrease the height for summer cap.
- This hat is worked in a continuous round up until the side of hat (Crossover Long DC Rounds).
- Use a stitch marker to mark last stitch of each round.
Instructions
- Rnd 1: Work 6 sc into a magic circle. [6 sts]
- Rnd 2: Work 2 sc in each st around. [12 sts]
- Rnd 3: [Sc in next st, 2 sc in next st] 6 times. [18 sts]
- Rnd 4: [Sc in next 2 sts, 2 sc in next st] 6 times. [24 sts]
- Rnd 5: Sc in next st, 2 sc in next st, [sc in next 3 sts, 2 sc in next st] 5 times, sc in last 2 sts. [30 sts]
- Rnd 6: [Sc in next 4 sts, 2 sc in next st] 6 times. [36 sts] For Doll stop increasing here and continue with Side of Hat.
- Rnd 7: Sc in next 2 sts, 2 sc in next st, [sc in next 5 sts, 2 sc in next st] 5 times, sc in last 3 sts. [42 sts]
- Rnd 8: [Sc in next 6 sts, 2 sc in next st] 6 times. [48 sts] For Preemie, stop increasing here and continue with Side of Hat.
- Rnd 9: Sc in next 3 sts, 2 sc in next st, [sc in next 7 sts, 2 sc in next st] 5 times, sc in last 4 sts. [54 sts]
- Rnd 10: [Sc in next 8 sts, 2 sc in next st] 6 times. [60 sts] For Newborn to 3 Months, stop increasing here and continue with Side of Hat.
- Rnd 11: Sc in next 4 sts, 2 sc in next st, [sc in next 9 sts, 2 sc in next st] 5 times, sc in last 5 sts. [66 sts]
- Rnd 12: [Sc in next 10 sts, 2 sc in next st] rep 6 times. [72 sts] For 6-12 months stop increasing here and continue with Side of Hat.
- Rnd 13: Sc in next 5 sts, 2 sc in next st, [sc in next 11 sts, 2 sc in next st] 5 times, sc in last 6 sts. [78 sts]
- Rnd 14: [Sc in next 12 sts, 2 sc in next st] 6 times. [84 sts] For Child/Adult Small stop increasing here and continue with Side of Hat.
- Side of Hat (Crossover Long DC Rounds)
- Rnd 1: Place St marker in last st made, sl st into next st, ch 1, hdc in same st, hdc in next 2 sts, cross-over long dc in last st of prev rnd (marked st), *sk next st, hdc in next 3 sts, cross-over long dc in skipped st; rep from * around; join with sl st in first hdc. [36, (48, 60, 72, 84) sts]
- Rnd 2: Ch 1, hdc in same st as join, hdc in next 2 sts, cross-over long dc in last st of prev rnd, *sk next st, hdc in next 3 sts, cross-over long dc in skipped st; rep from * around; join with sl st in first hdc. [36, (48, 60, 72, 84) sts]
- For doll size, move on to Next Rnd.
- For Preemie, 0-3m, 6-12m, and XS Adult only: Rep Rnd 2 for a total of (3, 5, 6, 8) Rounds made with the Cross Over Long Dc.
- Next Rnd: Ch 1, sc in same st as join and into each st around; join with sl st in first sc. [36, (48, 60, 72, 84) sts]
- Last 2, (2, 3, 3, 3) Rnds: Ch 1, work 1 bpsc in same st as join and into each st around; join with sl st in first bpsc. [36, (48, 60, 72, 84) sts] FO at last Rnd.
- Brim:
- Row 1: Make a slip knot and place it on your hook. With RS Facing, count 13, (18, 22, 27, 31) sts from where you fastened off and sl st into next st. 2 sc in next st, [sc in next 2 sts, 2 sc in next st] 2, (3, 4, 5, 6) times; sl st into next st. Turn. [10 (14, 18, 22, 26) sc and 2 sl sts.]
- Rnd 2: Ch 1, sc in sl st, sc in next st and into each sc across, insert hook into sl st, yo and pull up a lp, insert hook into next st of hat, yo and pull up a lp, (3 lps on hook) yo and pull through all loops on hook (sc2tog made) sl st into next st of hat. Turn. [12, (16, 20, 24, 28) sts and 1 sl st.
- Row 3: Ch 1, sc first sl st, sc in next st and into in each sc across, sc2tog over sl st two rows below and next st of hat, sl st into next st of hat. Turn. [14, (18, 22, 26, 30) sts and 1 sl st]
- Rep Row 3 another 1, (1, 1, 2, 2) times. [16, (20, 24, 32, 36 sts and 1 sl st] after last row is done.
- Last Row and Edging:
- With RS facing, ch 1, sc in first sl st, sc in next st and into each st across, sc2tog over sl st two rows below and next st of hat, working along the edge of hat, sc into each st around to first sc made in last row; join with sl st in first sc. FO.


So great tutorial! thanks for sharing.
Kizi, You’re very welcome. I’m glad you enjoy this pattern. :)
Excellent pattern. I love this! Found you on Ravelry :)
Thank you! Glad you found me. :)
I’m working up this hat right now! It’s so lovely but I’m wondering if you have a close up picture of what the rows look like stacked? I’m not sure if mine looks the same!
Rebekkah, I’m supposed to be working on doing a child-size hat on this and once I get around to it I will take the close-up and post it. Thanks so much for your patience.
thank you so much for sharing your pattern! i found it easy to follow. i made mine without the rim and it looked great! :)
Thanks so much for the feedback Gracie. :)
Thank you for the free pattern!! I am so happy to have a nice pattern for a bill that will actually stand out a bit!
You’re welcome, and thank you as well. :)
beautiful design! Thank you! I am wondering if you are okay with the finished item being sold? Thanks!
Shannon, Yes, absolutely. You have permission to sell both online or offline as long as you don’t go into mass production. Thanks so much. :)
I love the looks of this hat. I make hats for chemo patients. I’m something of a neophite to crochet. But, it’s time for a new style and pattern. I can’t wait to start this one. Your directions look great. Thank you for sharing.. and wish me luck!
Thanks and good luck! I think it’s a great thing that you are doing for other. Keep it up. :)
Why would my brim look floppy? Followed the pattern to a T, but the brim is much longer than the picture.
Would you happen to have a video of the crossover long double crochet portion? I can’t seem to figure that part out….but I am new to crochet. :-)
This might help: https://crochetncrafts.com/how-to-make-the-cross-over-long-double-crochet-dc/
Thanks! This helped me better understand and figure it out. Now I’m having trouble with the next round lol it seems like my stitches are stacking on top of one another rather than looking like a continuous pattern. Still working in it! :-)
Thanks for the free pattern for the hat. I am enjoying it a lot. Do you have a scarf pattern to go with it? Thanks again.
At this time I do not have a scarf, but I do have this cowl pattern: https://crochetncrafts.com/cross-over-long-dc-cowl/
A friend of mine ask me to make this hat. And whioled up for three hats. Really enjoyed whike making this. Thank you for the free pattern. ?
*whipped
I’m so glad you like the pattern. :)
This pattern is quick and easy to follow, im just in awe.. Absolutely amazing thank you for sharing.
Thank you so much for the feedback. :)
Hi. I would like to make a woman’s size one of these, for myself, to wear after I lose my hair due to chemo. How can I adjust the pattern for a larger adult size?
An easy way would be to use a slightly thicker yarn, then follow the hat sizing chart to get the circumference you need for a cap. https://crochetncrafts.com/crochet-hat-size-chart-by-age/
Imagine how nice it would be if you had a print button on here. trying to follow a pattern from a smartphone is not a very easy thing to do!!!
Hi Bernice, I hear you. :( but unfortunately I had to remove due to copyright reasons.
Terima kasih, suka sekali dengan tutorial pembuatan topi ini
Sukses selalu. Terima kasih telah berbagi
Thanks for patten from South Africa
Gorgeous pattern- thank you!