
Invisible Crochet Join

To be honest, I’ve known about the invisible join for a long, long time, but I’ve never used it! I learned how to make it, but quickly decided it was too much work. I know, I know, shame on me for being lazy; but I had discovered that if I made a tight slip stitch join that it kept the seams fairly straight and almost unnoticeable.
And I was happy with that … until recently.
I wanted to crochet a button, and I needed it to be pretty on the surface. And the way I had been joining my entire crochet life just wasn’t able to do the trick. Lucky for me, the invisible join came to my rescue.
The nice thing about the invisible join is that it resembles a regular crochet stitch from the side as well as from the top. It also takes up the width of a stitch, so you’ll need to consider that if the pattern doesn’t call for it. The last thing you want is for your finished item to look lopsided.
I wouldn’t go as far to join every round with the invisible join, but you most certainly could. If you’re making items to sell, it’ll give you a clean join in every round, which I’m sure your customers would love. But for me, it’s just too time consuming as you’d have a lot more ends to weave in. However, I could see myself using this to fasten off projects that are worked in a spiral. It would help to give you a clean finish at the last round. Otherwise, unless you’re changing colors at every round, it would be too much for me.
The Tutorial:
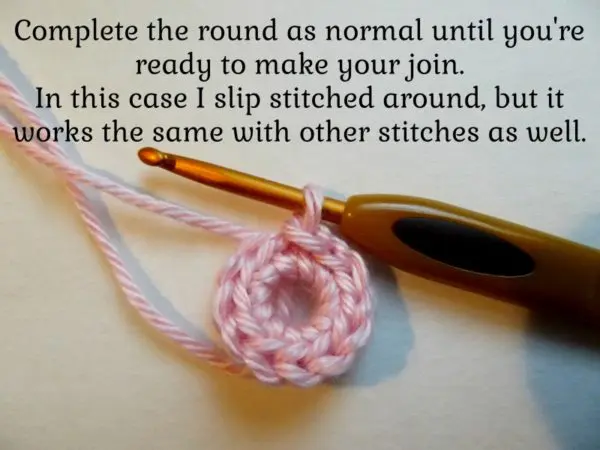
1.) Complete the round as normal until you’re ready to make your join. This works with all stitches, and for this tutorial, I’m working with slip stitches. And in the image below, I’m ready to make my join.
2.) Cut the yarn and pull the tail end through making sure not to pull the loop tight. It’s like fastening off, but you don’t make that additional chain.

3.) Weave the tail end through a yarn needle and insert it under the top loops of the first stitch made in the round.

4.) Pull the yarn through making sure not to pull it tight. You want the joining slip stitch to be at the same tension as the other stitches in the round. This is why it’s invisible – because it blends right in.

5.) Insert your needle into the last stitch made in the round.

6.) Again, pull the tail end through making sure to keep things at the same tension as before. Weave in your ends.

The invisible join is complete, but you can’t see it. It’s almost like magic… it’s there, but it isn’t. What you see is an extra stitch. The round had 12 stitches to begin with, but now it looks like there are 13. Pretty neat, eh?


I love this technique for the invisible join. I use it all the time! It’s nice that you don’t see the finishing stitch… it just blends in. Very neat and tidy!