
Lining a Crochet Purse
Lining a crochet purse is fairly easy to do once you have mastered the basics of sewing. A sewing machine helps to give you a professional look. However, you can also sew the purse liner by hand with a thread and sewing needle if you don’t have a machine.
Here is a link to the purse pattern used in this tutorial.
I added two optional pockets into the lining — one for credit or business cards and the other for miscellaneous items. For me, this will serve as a purse and wallet in one. Rarely do I carry cash on me, so it’s perfect for my needs. These pockets can be made to any size that you want.


Subscribe for Free Crochet Patterns, Coupons, and Other Crafty Promotions.
You will also receive a PDF copy of the Beads and Diamonds Purse pattern.
Your email will not be shared. Unsubscribe any time. By subscribing you agree to our privacy policy and terms of use.
How to Line a Crochet Bag
The instructions given in this tutorial should work for just about any bag or purse, regardless of how wide or tall.
Not only does this tutorial show you how to line a crochet bag, but it also gives you instructions on how to take measurements of any bag for a perfect-fitting bag liner every time.
Furthermore, the tutorial also covers how to line a bag with a zipper. A zipper is optional, but it’s always good to have one to make sure things don’t fall out of your bag or purse.
Materials Needed
- A Finished Crocheted or Knit Bag
- Fabric (I purchased half a meter and used about half of that for this bag.) Go for a strong cotton or any other strong material.
- Zipper
- Tape Measure
- Scissors
- Sewing Machine (If you don’t have one, you can sew by hand.)
- Needle and thread
- Iron
Taking and Calculating the Measurements
First, let’s take measurements of the bag. You will need measurements for the width, height, and also the width on the bottom of the bag.

Connecting Strip Width
This is the strip that connects the two side pieces on each side as well as on the bottom.
To obtain this width, take the measurement across the shortest width on the bottom of the bag. We will do the length later.
Width On Bag Bottom: 2.5″

Height of Bag
Lay the bag flat and measure from the top of the bag where you want the lining to reach, down to where it will meet the connecting strip.
Bag Height Measurement: 6.5″

Width of Bag
Lay the bag flat and measure from side to side to obtain the Total Width of Bag.
Take that measurement and subtract the measurement obtained for “Connecting Strip Width”.
The final number is considered the “Width of Bag”.
My Measurements & Calculations
Total Width of Bag: 10.5″.
Connecting Strip Width: 2.5″
Subtract the Connecting Strip Width from the Total Width of Bag: 10.5″ – 2.5″ = 8″Width of Bag: 8″
Connecting Strip Length
The strip length is 2 times the “Height of Bag”, plus the “Width of Bag”.
Connecting Strip Length: 6.5″ + 6.5″ + 8″ = 21″
Add a Seam Allowance
After you’ve taken all measurements, add 1″ seam allowance to each dimension in order to have a 1/2″ seam allowance on each side for sewing.
If you are comfortable with a 1/4″ seam allowance, then only add 1/2″ to each dimension.
Here are my measurements as taken:
- Connecting Strip Width: 2.5″
- Connecting Strip Length: 21″
- Height of Bag: 6.5″
- Width of Bag: 8″
After Adding My Seam Allowance, I have the following Measurements:
These are the measurements to cut.
- Connecting Strip Width: 3.5″
- Connecting Strip Length: 22″
- Height of Bag: 7.5″
- Width of Bag: 9″
Formula for Adding Pockets to Your Bag
Adding pockets is easy! Decide how wide and tall you would like them. Then, multiply the height by 2, and add 1 inch to each dimension for a 1/2 inch seam allowance.
The formula for Pockets:
- Width + 1″ for seam allowance
- Height x 2 + 1″ seam allowance
My Measurements:
- Credit Card Holder (Cut 1)
- 7″ by 8″ (This will give you two credit card pockets with a total measurement of 6″ wide and 4″ high, OR 3″ by 4″ each.)
- Larger Pocket (Cut 1)
- 7″ by 9″ (This will give you one pocket measuring 6″ wide and 4.5″ high.)
Cutting Your Material
Now you are ready to begin cutting your material.
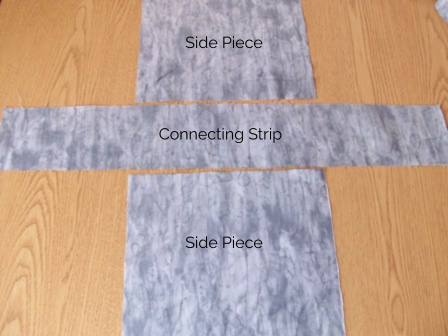
Cut 2 side pieces using the “Height” and “Width” of the bag measurements.
Cut 1 connecting strip using the “Connecting Strip ‘Width’ and ‘Length'” measurements.
Here are my two side pieces and the connecting strip cut to the measurements with seam allowances factored in.

These are my two pieces for the pockets.
Preparing the Pockets

With right sides facing, fold the credit card holder in half from top to bottom. The measurement should be 7″ by 4″ after it is folded.

Do the same for the second pocket, which should measure 7″ by 4.5″ after it is folded.
With your iron, press both pieces to set the crease.
Sew a half-inch seam along the open edges, leaving about 2-3″ open at the bottom. Do not sew along the top fold.

Snip the corners.

Turn both pockets right side out.

Position each pocket on the right side of the bag lining, making sure the open part is facing the bottom of the bag.
Pin pockets in place, one on each side of the bag.

Sew pockets onto each side piece, sewing as close to the edges of the pockets as possible, and leaving the top open.
The one large pocket is done.

For the credit card holder, sew a vertical line down the center of the pocket to act as a divider for the cards.
Sewing the Bag Liner
You can begin sewing the bag liner for your crocheted or knit bag.

To make it easier for sewing, press all seams to the wrong sides of the fabric.
Not only will this step make it easier, but it will also help to make the liner look professional.
Starting at the bottom of the bag, and with the right sides of seams facing, align the bottom of the side pieces with the connecting strip, making sure the side pieces are centered along the connecting strip.

Pin the connecting strip to the bottom edge of the two sides.

Now sew along the bottom of each side, beginning and ending 1/2″ from the edge of the side piece.
This is the 1/2″ seam allowance needed for joining the sides to the connecting strip.
Press the seams open.

Next, fold the connecting strip over and align it with the corresponding seam of the side piece.
Note: I found it helpful to have the right side facing out, pin together, then flip it wrong side out and re-pin the seam before sewing.
You will do this for each seam along the four sides.
I pinned and sewed each seam separately, and sewed from the top of the bag liner, down towards the bottom.

Breaking it down…
Here is the wrong side of the first seam pinned and ready for sewing.

Here, the first seam is finished.

Here, all four side seams are sewn.
Press seams open.
Then re-press the top seamline back to the wrong side if it comes undone. (This seam has not been sewn yet.)
The liner is now ready for the zipper.
If you don’t want the zipper, simply sew along the top edge to secure the seam.
Adding a Zipper to Your Bag Liner
A zipper makes the bag secure, so you don’t have to worry about stuff falling out. If you do not want a zipper, you can skip this part.

With the wrong side of the bag liner facing out, lay the liner flat and pin the zipper so that the right side of the zipper faces up as pictured.

Pin the zipper to one side as pictured, making sure that the teeth are sticking over the fabric.

It’s hard to see in the image, but when looking at it from the right side of the fabric, you should be able to see the zipper teeth sticking over the edge of the fabric.
Adjust your zipper, if needed, to ensure it is evenly spaced from the edge.

Pin the other side in the same manner.
You might want to close the zipper to make sure it lines up with the other side.

Open and close the zipper a few times, making sure it opens and closes without getting caught on the fabric.
Open the zipper again, and with a zipper foot, sew both sides of the zipper to the bag.
You should have a small end of the zipper sticking out on either side of the bag.
How to Sew the Bag Liner To the Bag

Turn the Bag Lining right side out.
Turn your crocheted or knit bag inside out.
Slip the lining over the bag, aligning the sides and making sure the zipper ends are tucked in behind.

Also, make sure that the zipper ends align with the handles on the bag.
Pin the lining to the bag.

Make sure that the end of the zipper is tucked in. At the same time, also make sure that the zipper slider is still accessible.
With a needle and thread, hand-sew the lining to the bag along the same stitches where the zipper was attached to the lining. The stitches can be worked into every machine stitch.

Flip the bag inside out.
Optional: To Line the Bag Handle
To line the handle, simply measure the length and width. Add your seam allowance to your measurement.
Press seams over to the wrong side, and with a sewing machine, sew around to secure the seam.
Next, with the wrong side facing the handle, pin the lining to the underside of the bag handle. With a needle and thread, hand-sew the lining to the handle.


It’s really great to learn from the links provided about how to make lining cloth for the crochet bags. I am very much interested in making crochet bags to be used by myself. If you don’t mind, if the crochet patterns are provided , I’d be very happy to create more bags . Please also give me the crocheting patterns . Thanks.
Good, clear instructions for professional finish.
Great tutorial! I’m always looking for more clear instructions to line a bag. These are really good!
Thanks so much. This really helps.
So very helpful! This is the best tutorial I’ve ever seen for lining a crocheted bag. Thank you so much!