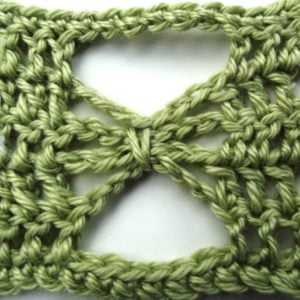
Crochet Butterfly Stitch
The crochet butterfly stitch is a quick and easy way to add some lace to any crocheted garment. I’ve seen it used in many crocheted hats as it adds a nice touch when added along the brim. I imagine it might also look good in scarves and neckwarmers, bags, doilies and other home decor patterns.
When I first discovered the stitch I designed a butterly summer tank pattern that uses this stitch almost throughout the whole pattern. Not sure if that was a good idea or not, but that’s what I did and I still wear it.
Although the butterfly stitch is very simple to crochet, it can be a bit confusing when the pattern says to crochet around the loops. So here is a tutorial showing how to crochet the stitch from start to finish.
Crochet Butterfly Stitch
Step 1: The first step in crocheting the butterfly stitch is to crochet your foundation. Next, you’ll need to make at least 1 stitch in the row or round. In this case I made 4 stitches.
You could probably use any stitch that you wanted, but I find that double and half double crochets look good. For this tutorial I worked with double crochets.
Now you’re ready to make your chains as the pattern instructs. My favorite is to use even numbers between 4-10. Below I chained 6.
Crochet Butterfly Stitch Tutorial – Step 1.
Step 2: Skip the same amount of stitches below as you made chains. In the image below I made 6 chains and also skipped 6 stitches. Then I crocheted into the next stitch.
Step 3: Repeat step 2 for 3 rows/rounds making sure that all your chains are directly above each other.
Step 4: Start your next row/round as normal and crochet up to the chains.
Step 5: Now make half the chains as you made in the previous row/rounds. In my case I had 6 chains in my previous rows so I’m going with 3 chains here.
If you made an uneven number of chains in previous rounds subtract 1 and divide that in half. For instance, if you have 5 chains, chain 2 for this step. For 7 chains, chain 3, etc. The single crochet that you’ll make next will make up for the subtracted chain.
Step 6: Now you will gather your loops by crocheting a single crochet around them. To do that insert your hook underneath all 3 loops as pictured. Notice how the working yarn remains on top of the fabric.
Step 7: Wrap the yarn over at the back and pull it through to the front of the fabric. You should have 2 loops on the hook.
Step 8: Wrap the yarn over again and pull through both loops on your hook. Your single crochet is now complete. :)
Step 9: Now chain the same number of chains as you did in step 5. In my case I chained 3.
Step 10: Continue to crochet above the other stitches.
Step 11: For the last row or round of the butterfly stitch repeat step 2: Work your stitches along the sides with the same number of chains in the center as you did previously. In this case I chained 6.
Your butterfly stitch is now complete.
Step 12: You can use the last round as the first loop for the next butterfly stitch, or you can crochet into the loop or the chains. In this case I single crocheted into the chains.
Crochet Stitch Tutorials
See More Crochet Stitches


I have never heard of this stitch before. I like learning and seeing new stitches. This is one that I will have to try.
I have never seen this stitch before. I can’t wait to start my first project using the butterfly stitch. Thank you for the tutorials, as I am a very visual learner.
Thanks so much for this pattern. My first attempt went way off and i ripped it out and tried again with the result being BINGO! It’s so pretty and i absolutely love it. Turned out smaller that i had intended but i’ll do this one again and again with different yarns and hook sizes. It’s def my fav now.