
Cowl Poncho


This crochet cowl poncho pattern is worked with two colors to give you a pretty striped design, which goes well with the stitch pattern used. Choose your favorite two colors to match your outfits, or choose a solid color too if you like.
Either way, this crochet poncho pattern is perfect for all occasions as an alternative to a spring jacket or a shawl.
This poncho is a bit different than most because it only has one point that you can wear at the front, back or at the side. Personally, I prefer to wear it at the side, but the choice is yours.
Although the pattern is very simple, I included a lot of photos to help in the various steps to hopefully make it easier for those who are still new to crocheting.


Finished Size
This pattern is given in an extra small size. It fits me.. so it’ll fit a child, small teen or extra small adult.
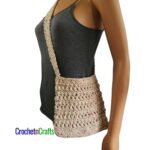
The mannequin on which the poncho is shown is 37″ around the shoulders above the chest. As you can see, it’s a tight fit on the mannequin.
I’m 35″ around the shoulders with a 32″ bust, and it fits nicely. Instructions are given for a custom fit.

The Yarn
For this crochet poncho pattern I chose Caron Simply Soft. However, any similar worsted weight yarn will work.
So long as the yarn gives you a nice drape you can make any substitution you like. Simply do a gauge swatch, and then make adjustments to the size as needed for a custom fit.
Caron Simply Soft


Subscribe for Free Crochet Patterns, Coupons, and Other Crafty Promotions.
You will also receive a PDF copy of the Seeded Lace PDF pattern bundle.
Your email will not be shared. Unsubscribe any time. By subscribing, you agree to our privacy policy and terms of use.

Cowl Poncho
Skill Level:
Materials
- Yarn: Caron Simply Soft Two 6oz balls – one of each color. If making it larger you'll need two of each color
- Crochet Hook: I/9-5.50mm
- Tools: Measuring Tape, Scissors, Yarn Needle.
Measurements
- Gauge: 2" over 7 sc sts.
- Finished Size: Fits a child, teen, or extra small adult. However, it can be modified to any size.
Abbreviations
- CA = Color A – Lavender or Baby Blue
- CB = Color B – Bone/Tan or White
- RS = Right Side
- WS = Wrong Side
- Bl/bls = Back Loop/Back Loops
- Ch/Chs = Chain/Chains
- CLDc = Cross-Over Long Double Crochet
- Fl = Front Loops
- FO = Fasten Off
- Hdc = Half Double Crochet
- Hk = Hook
- Rep = Repeat
- Sc = Single Crochet
- Sk = Skip
- Sl St = Slip Stitch
- St/Sts = Stitch/Stitches
- See the Crochet Abbreviations chart for more details.
- This pattern is written in American Crochet Terms
Notes
- All rows are worked into the front loops only. All rounds are alternated between the front and back loops.
- Join the new color at last stage in last st of previous row. When working in the rounds you can join the new color in the sl st when you join the round. Carry the unused yarn up.
- It’s hard to tell which side is the RS as both sides look very similar. An easy way to remember is that the RS is facing you when you do the Cross-Over Long DC’s.
Helpful Links
Instructions
- With CA, Ch 47, or any multiple of 4 + 3. (This will be the length from the neck down to where you want the poncho to come to at the side.)
- Row 1: (WS) Sc in 2nd ch from hk and in each ch across. (46 sts). Turn.
- Row 2: (RS) Continue with CA, Ch 1, working in fl only, hdc in first st, *sk next st, hdc in next 3 sts, cross-over long dc in skipped st; rep from * across; hdc in last st. (46 sts) Turn.
- Rows 3-4: With CB, ch 1, sc in first st and into each st across. Turn.
- Row 5: With CA, ch 1, sc in first st and into each st across. Turn.
- Rows 6-102: Rep rows 2-5 until you have reached a desired length ending with row 2 at last row. Join CB and FO CA. Do Not Turn at last row.
- Edging:
- Rnd 1 (RS): With CB, ch 1, work 1 sc in last st made (ill 1), begin working along the side and sc evenly around working 3 sc into each corner (ill 2). When you get to the last side, work into the bls only (ill 3), and end with 2 sc in both lps of same st as where first sc was made (ill 4); join with sl st in first sc. (352 sts)

- Joining the End to the Side. (Refer to illustrations below)
- Lay the fabric strip down with RS facing up.
- Fold the fabric as pictured below (ill 6), so that right sides are facing each other and the WS is facing outward. Starting at the center st at the corners begin to join the two sides with sl sts (ill 6). When you hold the fabric up you will catch the bl only on both fabric strips (ill 7). This way you get a ridge on both sides of the fabric and it aligns with the rest of the pattern.

- Finished seam on WS (ill 8). Turn the poncho RS out. (ill 9) Block seam between two damp towels.


- Cowl/Collar – Begin Working in Rounds:
- Rnd 1: With CB and working in fl only, ch 1, sc in each st around. Join with sl st in both lps of first sc. Do NOT Turn at this round or hereafter. Increase/decrease a few for a multiple of 4. I had a total of 84 sts.
- Rnd 2: With CA and working in bl only, sc in same st as join and into each st around; join with sl st in both lps of first sc. Place Marker in Last St Made.
- Rnd 3: Working in fl only, Ch 1, hdc in same st as join, hdc in next 2 sts, cross-over long dc in last st of previous rnd (marked st – ill 10 &11), *skip next st, hdc in next 3 sts, cross-over long dc in skipped st; rep from * around; join with sl st in both lps of first hdc. (84 sts)
- Rnd 4: With CB and working in bl only, ch 1, sc in same st as join and into each st around; join with sl st in both lps of first sc.
- Rnd 5: Working in fl only, ch 1, sc in same st as join and into each st around; join with sl st in both lps of first sc.
- Rnds 6-21: Rep rnds 2-5 until you have reached a desired height for the cowl. FO.
- Final Edging at Bottom
- Rnd 1: With CB, join yarn along seam area on bottom and working in fl only, sc evenly around working 3 sc into the corner. Join with sl st in both lps of first sc.
- Rnd 2: Working in bl only, sc in same st as join and into each st around making sure to work 3 sc into corner st; join with sl st in both lps of first sc.
- Rnd 3: Working in fl only, ch 1, sc in same st as join and into each st around working 3 sc into corner. Join with sl st in both lps of first sc. FO.


Ponchos
See All Crochet Poncho Patterns.


This is lovely. Thank you so much for the pattern. The stitch pattern is beautiful and I so very much like the cowl neckline!!!