
Any Size Crochet Hat Pattern
This crochet hat pattern works up quickly and easily, and to any size that you want. The name came about because the hat can literally be crocheted to fit any size, from newborn to adult.
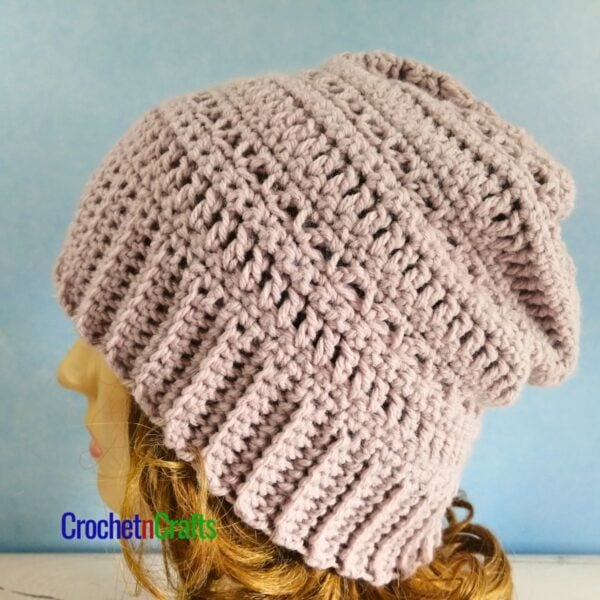
The crochet hat has a slouch, making it great for those who love to wear their hair in a bun.
The pattern is mindless to work on once you get going on it. It’s a nice stashbuster for cleaning up some of the smaller ends of scraps. Plus, it’s a great gift idea! And it doesn’t take long to crochet, which makes it an ideal pattern for craft fairs as well.
Wear it as is, or add a pom pom at the top. You can purchase them or make your own with leftover yarn to match the hat. Here is a tutorial on how to make a pom pom.


Subscribe for Free Crochet Patterns, Coupons, and Other Crafty Promotions.
You will also receive a PDF copy of the Pretty Simple Slouch Hat pattern.
Your email will not be shared. Unsubscribe any time. By subscribing, you agree to our privacy policy and terms of use.
Any Size Crochet Hat Pattern Information
Skill Level: Easy
This easy crochet hat pattern is started at the brim. I didn’t do a ribbing, but instead I did a round in the bead stitch to give you some pretty textures.
The body of the hat pattern is crocheted using the crossed half double crochet stitch. Love the beautiful texture and the slight spiral that you get while crocheting.
The top is done with one round of decreases. Then leave a long tail while fastening off for sewing the top.
Other hat patterns that you might enjoy are the Single Crochet Beanie Pattern, the Pretty Simple Slouch Hat Crochet Pattern, or the Criss Cross Slouchy Beanie.
Materials
- Yarn: Caron Simply Soft (Worsted Weight, #4; 100% acrylic; 6 oz/170.1g; 315yds/288m)
- Hook Size: I/9-5.50mm
- Other: Measuring Tape, Scissors, Yarn Needle.
I used Caron Simply Soft, a #4 medium worsted weight yarn. I like this yarn because it’s soft and durable!
You could probably substitute with other worsted weight yarns as well. If the gauge doesn’t match, simply adjust the number of stitches in the round, and you should be good to go!
Measurements
- Gauge: Measures 4″ over 14 hdc sts and 10 rounds.
- Finished Size: When laying flat the hat measures 10″ across and 10.5″ from top to bottom. Cowl measures 7.5″ high and 25″ long.
The finished hat circumference is 20 “, for an adult small hat. However, the stitch pattern is a multiple of two, which makes it super easy to adjust. Also, the hat is crocheted from the bottom up, which makes it easy to test the measurement out before finishing the whole hat.
Generally, hats are sized with a 2-inch negative ease. But this hat, because it doesn’t have ribbing, I wouldn’t recommend too much negative ease. I made this to fit my 20″ head circumference and loved how it fit!
Here is a crochet hat size chart which covers all sizes from preemie to adult large!
Abbreviations
- CA = Color A
- CB = Color B
- Bead St = Bead Stitch
- Bls = Back Loops
- Ch/Chs = Chain/Chains
- FO = Fasten Off
- Hdc = Half Double Crochet
- Hk = Hook
- Lp/Lps = Loop/Loops
- Rep = Repeat
- Rnd/Rnds = Round/Rounds
- Sc = Single Crochet
- Sk = Skip
- Sl St = Slip Stitch
- St/Sts = Stitch/Stitches
- Yo = Yarn Over
Special Stitch Instructions
- Bead St: Insert hk into indicated st, yo and pull through, (yo and pull through one lp on hk) twice, yo and pull through both lps on hk. When you work into the next stitch make sure the bobble is facing the right side.
Note
- Carry CA up when you switch to CB in rnd 3.
Helpful Links
Any Size Crochet Hat Pattern Instructions
With CA, Ch 70 (or any multiple of 2 to get circumference needed), join with sl st in first ch being careful not to twist chs.
Rnd 1: Working into back bumps, ch 1, sc in same ch as join and into each ch around; join with sl st in first sc. (70 sc)
Rnd 2: Working into bls only, ch 1, sc in same st as join and into each st around; With CB, join with sl st in first sc.
Rnd 3: With CB and working into both lps, ch 1, work bead st in same st as join, sc in next st, *bead st in next st, sc in next st; rep from * around; With CA, join with sl st in first sc. FO CB.
Rnd 4: With CA and working in both lps, ch 1, sc in same st as join and into each st around; join with sl st in first sc.
Rnd 5: Working into bls only, ch 1, sc in same st as join and into each st around; join with sl st in first sc.
Rnd 6: Working into both lps, ch 1, sk the first st, hdc in next st, hdc in skipped st, *sk next st, hdc in next st, hdc in skipped st; rep from * around; join with sl st in first hdc.
Rnds 7-30: Same as rnd 6. FO at last rnd leaving a long enough tail to weave into and closing off the last rnd.
More Free Crochet Patterns



Caron Simply Soft Patterns


Crochet Cross Stitch Patterns
See All Crochet Cross Stitch Patterns.


How do you close off this hat???? I have a big hole?
To close the hole, weave the yarn in through the last row and pull tight. Let me know if that helps.
Step 6 makes no sense what so ever. In lost. How exactly are you supposed to skip a stitch and then go back and work a hdc in it?
Hi Elizabeth, it’s called the crochet crossed stitch. here is a short photo tutorial: https://crochetncrafts.com/how-to-make-the-cross-stitch-in-crochet/
Hope that helps. :)