Criss Cross Slouchy Beanie
The criss cross stitch beanie crochet pattern is worked up in the cross stitch. It’s the perfect hat for the spring and fall when the weather is in between extreme temperatures. With that said, you could always line the inside with a cozy material for a cozy winter hat as well.

It’s the perfect match to go with the Criss Cross Cowl that was published a few weeks ago. And if you’re looking for something a bit lighter over the head, you might want to try this crochet ear warmer pattern.
The pattern is very simple and mindless once you get going on it, but the finished fabric looks elegant enough to wear with anything fancy. It’s crocheted here in a not-so-elegant yarn, but choose something soft like Caron or Vanna’s Choice for a super comfortable set.
Another thing I like about this hat is that it has a nice lacy look, but with a solid brim to keep the ears and forehead nice and cozy.
The Stitch Pattern
The beanie is started at the brim, which is worked in rows until you get to the circumference that you want. Then you join the brim and begin working in rows for the body.
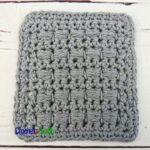
The body of this crochet beanie pattern is worked with the front loop cross double crochet stitch. The crochet cross stitch is made simply by skipping a stitch and then backtracking and crocheting into the skipped stitch. It creates a nice and lacy, yet simple design on the fabric.
Once you get to the height that you want, you do a round of decreases to begin the closure at the top, which is sewn together.
I chose not to, but you can always add a pom pom to the top if you like. You can make one or purchase one from the store. Here is a tutorial: How To Make a Pom Pom
The Size
This beanie pattern is designed to fit a teen/adult small, but can be adjusted to any size as needed in a simple multiple of two along the brim. Refer to this Crochet Hat Size Chart by Age.
Other Patterns to Try
- Single Crochet Beanie Pattern
- Cross-Over Long DC Free Crochet Newsboy Hat Pattern
- Extended Single Crochet Cap
- Two Together – Two Color Beanie
- Split Shells and Ribs Crochet Beanie Hat Pattern

Criss Cross Slouchy Beanie
Skill Level
Materials
- Yarn: Red Heart Super Saver (Worsted Weight (#4) 100% acrylic, 7 oz/198g – 364 yds/333m) – 1 ball.
- Crochet Hook: H/8-5.00mm & I/9-5.50mm
- Other: Measuring Tape, Scissors, Yarn Needle.
Measurements
- Gauge: 3" over 10 sts.
- Finished Size: Laying flat it measures 9 by 9"
Abbreviations
- Blsc = Back Loop Single Crochet
- Blsc2tog = Back Loop Single Crochet 2 Together
- Ch/Chs = Chain/Chains
- Fldc = Front Loop Double Crochet
- Flsc = Front Loop Single Crochet
- Rep = Repeat
- Sc = Single Crochet
- Sk = Skip
- Sl St = Slip Stitch
- St/Sts = Stitch/Stitches
Notes
- This hat is started at the brim and worked up. The top is closed by weaving the yarn through the last round and pulling tight to close.
- The first crossed stitch is worked over the first and last sts made in the previous round. This way the beginning ch-2 is hidden for a seamless look. It also staggers the crossed stitches for a super cool design.
- All rounds are crocheted into the front loops only. All rounds are joined in both loops.
- Begin to turn after rnd 2.
- Refer to the following tutorial if you need help with the crossed stitch.
Cross Stitch Tutorial
Helpful Links
Instructions
Ribbing Rows
- Row 1: With H hook, Ch 10, sc in 2nd ch from hook and in each ch across. Turn. (9 sts)
- Row 2: Ch 1, blsc in each st across. Turn.
- Rows 3-64: Continue with row 2 until you have reached a desired circumference making sure to end in an even number of rows.
- Ch 1 and join the ribbing rows by slip stitching the last row to the free loops of starting chs.
Working in the Round (Body of Hat)
- Rnd 1 (RS): With I hook and working along the ribbing edge and into each ribbing row. Ch 1, sc in first row end and into each row end around; Mark Last st made & join with sl st in first sc. (64 sts)
- Rnd 2 (RS): Ch 2 (does not count as st), fldc in first st, fldc in marked st; *sk next st, fldc in next st, fldc in skipped st; rep from * around; join with sl st both loops of first fldc. Turn. (64 sts or 32 crossed sts)
- Rnd 3 (WS): Ch 1, flsc in first st and in each st around; join with sl st in both loops of first flsc. Move stitch marker to where join was made. Turn. (64 sts)

- Rnds 4-14: Rep rnds 2 & 3 ending rnd 14 with rnd 2 and omitting the last turn.
- Rnd 15 (RS): Ch 1, blsc2tog around; join with sl st in first blsc2tog. (32 sts) Fasten off leaving an 8" tail for weaving in through the last round. Pull tight to close the hole and weave in tail end to secure.