
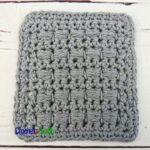
Crochet Blossom Stitch
The crochet blossom stitch has a nice lacy appearance to it. I fell in love with it due to the prettiness as well as the ease of the stitch. It allows for hours of fun and mindless crochet once you get started on it.
This easy crochet stitch pattern is perfect for summer tops, afghans, bags, dishcloths or anything else you can think of! Scroll to the bottom for some free patterns using this stitch pattern.
In this tutorial I show you how to work this wonderful crochet stitch in rows as well as in rounds. I’ve included a written pattern along with a photo tutorial. The video tutorial is coming soon.


Written Pattern – Working in Rows
Ch any multiple of 4 + 2.
Row 1 (RS): Sc in 2nd ch from hook, *sk next ch, v-st in next ch, sk next ch, sc in next ch; rep from * across. Turn.
Row 2: Ch 4 (counts as first dc and ch-1 sp), (sc, ch 1) in first v-st, *(dc, ch 1) in next sc, (sc, ch 1) in next v-st; rep from * across to last sc, dc in last sc. Turn.
Row 3: Ch 1, sc in first dc, *v-st in next sc, sc in next dc; rep from * across. Turn.
Rep rows 2-3.
Written Pattern – Working in Rounds
Ch any multiple of 4, join with sl st in first st being careful not to twist.
Rnd 1: Ch 1, sc in same ch as join and into each ch around; join with sl st in first st.
Rnd 2: Ch 1, sc in same ch as join, sk next st, v-st in next st, sk next st*, sc in next st; rep from * around ending last rep at **; join with sl st in first sc. [20 V-sts]
Rnd 3: Ch 4 (counts as first dc and ch-1 sp), (sc, ch 1) in v-st*, (dc, ch 1) in next sc; rep from * around ending last rep at **; join with sl st in first dc. [40 ch-1 sps]
Rnd 4: Ch 1, sc in same st as join, v-st in next sc*, sc in next dc; rep from * around ending last rep at **; join with sl st in first sc. [20 V-sts]
Rep Rnds 3 and 4 until you have reached a desired height
Last Rnd: Ch 1, sc in same st as join and into each st and ch around; join with sl st in first sc. Fasten Off.
Photo Tutorial – Working in Rows
This tutorial shows you how to make the blossom crochet stitch. It’s a combination of v-stitches, double crochets, single crochets, and chains.

Step 1
To get started, ch any multiple of 4 + 2 for the width.

Step 2
Row 1: Single crochet in 2nd chain from hook.
Skip the next chain.

Step 3
Double crochet into the next chain.

Step 4
Chain 1,

Step 5
Double crochet again into the same chain.
The first v-stitch (dc, ch 1, dc) is now complete.

Step 6
Skip the next chain.

Step 7
Single crochet into the next chain.

Step 8
Repeat across: skip 1 chain, v-stitch in the next chain, skip 1 chain, single crochet into the next chain.

Step 9
Row 2 Chain 4. (Counts as first double crochet and chain 1 space.)

Step 10
Single crochet into first chain 1 space. Chain 1.

Step 11
Double crochet into next single crochet. Chain 1.

Step 12
Repeat steps 10 and 11 across to the last stitch.
Double crochet into the last stitch.

Step 13
Turn.
Chain 1, single crochet into the first stitch.
Alternatively, you can omit the single crochet and use the chain 1 as your first single crochet stitch.

Step 14
V-stitch into the next stitch.

Step 15
Single crochet into the next double crochet.

Step 16
Repeat Steps 14 and 15 across.
Then repeat from step 9 (rows 2 and 3) until you have the length that you want.
Photo Tutorial – Working in Rounds
The following steps show you how to work the blossom stitch in the round. Its a great stitch for making hats, cowls, and many other projects.

Step 1
Chain any multiple of 4. Join the first and last chains with a slip stitch being careful not to twist the chains.

Step 2
Rnd 1: Chain 1.

Step 3
Single crochet into the same chain as join and into each chain around.
Note: I worked into the back bumps, but you don’t have to.

Step 4
Rnd 2: Chain 1. Single crochet into the same stitch as where the join was made.
Skip the next stitch.

Step 5
Double crochet into the next stitch.

Step 6
Chain 1.

Step 7
Double crochet again into the same stitch.
Skip the next stitch.

Step 8
Single crochet into the next stitch.

Step 9
Repeat around.

Step 10
Chain 4. Counts as first double crochet and chain 1 space.

Step 11
Single crochet into chain 1 space. Chain 1.

Step 12
Double crochet into the next single crochet. Chain 1.

Step 13
Repeat around. Join with a slip stitch in the third chain.

Step 14
Rnd 4: Chain 1. Single crochet into the same stitch as join.

Step 15
Double crochet, chain 1, double crochet into next single crochet.

Step 16
Single crochet into the next double crochet.

Step 17
Repeat around. Join with a slip stitch.
Rep Rnds 3 and 4 until you have the height that you want.

Step 18
Final Rnd: Chain 1, single crochet into each stitch and chain around.
Join with a slip stitch and fasten off.
Video Tutorial
This video shows how to make the blossom stitch in rows as well as in rounds.
Blossom Stitch Crochet Patterns
See More Blossom Stitch Crochet Patterns.


Sooooooo pretty !