
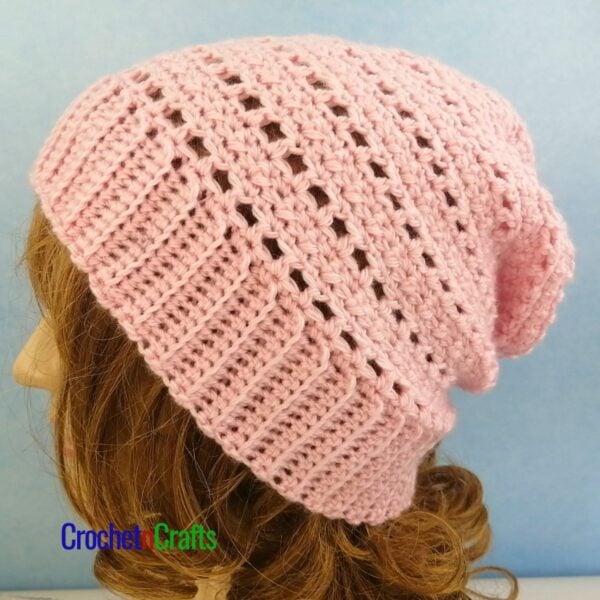
Blossom Stitch Crochet Cap
This crochet cap is crocheted in a cotton material, which makes it perfect for spring, summer and fall weather. It’s great for keeping the sun out of the eyes without being too hot.
And, if you like, you can omit the brim and wear it as a super cool beanie. In that case, you could try crocheting it in an acrylic material for a cozy winter hat. Another option would be to try some stripes to clean up some odds and ends.
Either way, it is a great gift idea for anyone who likes to wear hats during the warm weather.

Adjusting the Size of the Crochet Cap
The size is given in one size only; to fit a teen/adult small. However, you can easily increase the diameter as needed to get the size you want. The only thing to keep in mind is you need to end up with the correct stitch multiple for the blossom stitch, which is a multiple of 4.
Refer to this Crochet Hat Size Chart by Age if you’re unsure of how big to make the diameter.
Once the diameter is the size you need, the body is easy. Simply follow the pattern as instructed until you have the height that you want.
The brim is the only tricky part. But with a bit of trial and error you can get that to the size you need as well. I don’t have an exact formula on how to calculate the brim, but I’ll break down what I did and hopefully that will give you an idea of how to go about it.
There are 88 stitches in the last round of the hat.
For the first row of the brim I skipped 32 stitches from where I fastened off before I joined my yarn for the brim. Then I worked into 24 stitches for the brim and had 32 stitches left on the other side of the hat. 32+24+32=88.
In order to keep the brim looking the same, regardless the size, is to keep the above numbers in a similar ratio.
So if you add an additional 4 stitches to the body of the hat for a total of 92 stitches. You could try going with the following numbers: 33+26+33=92
Tip: Try placing stitch markers along the edge of the hat to make it easy to see where the next stitch goes when you do the brim.
Blossom Stitch Crochet Cap
Skill Level
Materials
- Yarn: Butterfly Mercerized Cotton – DK (#3) 1 125gr./249yard skein. – It is no longer available, but other cottons in that yarn weight should work just as well.
- Crochet Hook: E – 3.50mm & G – 4.0mm
- Other: Measuring Tape, Scissors, Yarn Needle.
Measurements
- Gauge: 1.25″ over first 2 rnds. 4″ over 19 sts/chs throughout pattern. 3″ over 10 dc/v-st rows.
- Finished Size: Laying flat, it’s approximately 18″ in circumference and 7″ top to bottom, not counting the brim.
- Hat will stretch to fit Teen/XSmall Adult.
Abbreviations
- Ch/Chs = Chain/Chains
- Dc = Double Crochet
- Hdc = Half Double Crochet
- Rep = Repeat
- RS = Right Side
- Sc = Single Crochet
- Sk = Skip
- Sl St = Slip Stitch
- Sp/Sps = Space/Spaces
- St/Sts = Stitch/Stitches
- V-st = V Stitch
Special Stitch Instructions
- V-Stitch (V-st): (dc, ch 1, dc) in designated chain or space.
Instructions
Rnd 1: With E hook, ch 2, work 8 hdc into 2nd ch from hook; join with sl st in first hdc. [8 sts]
Rnd 2: Ch 1 (does not count as st now and throughout), work 2 hdc in same st as join and into each st around; join with sl st in first hdc. [16 sts]
Rnd 3: Ch 1, hdc in same st as join, 2 hdc in next st, *hdc in next st, 2 hdc in next st; rep from * around; join with sl st in first hdc. [24 sts]
Rnd 4: Ch 1, hdc in same st as join and into next st, 2 hdc in next st, *hdc in next 2 sts, 2 hdc in next st; rep from * around; join with sl st in first hdc. [32 sts]
Rnd 5: Ch 1, hdc in same st as join and into next 2 sts, 2 hdc in next st, *hdc in next 3 sts, 2 hdc in next st; rep from * around; join with sl st in first hdc. [40 sts]
Rnd 6: Ch 1, hdc in same st as join and into next 3 sts, 2 hdc in next st, *hdc in next 4 sts, 2 hdc in next st; rep from * around; join with sl st in first hdc. [48 sts]
Rnd 7: Ch 1, hdc in same st as join and into next 4 sts, 2 hdc in next st, *hdc in next 5 sts, 2 hdc in next st; rep from * around; join with sl st in first hdc. [56 sts]
Rnd 8: Ch 1, hdc in same st as join and into next 5 sts, 2 hdc in next st, *hdc in next 6 sts, 2 hdc in next st; rep from * around; join with sl st in first hdc. [64 sts]
Rnd 9: Ch 1, hdc in same st as join and into next 6 sts, 2 hdc in next st, *hdc in next 7 sts, 2 hdc in next st; rep from * around; join with sl st in first hdc. [72 sts]
Rnd 10: Ch 1, hdc in same st as join and into next 7 sts, 2 hdc in next st, *hdc in next 8 sts, 2 hdc in next st; rep from * around; join with sl st in first hdc. [80 sts]
Rnd 11: Ch 1, hdc in same st as join and into next 8 sts, 2 hdc in next st, *hdc in next 9 sts, 2 hdc in next st; rep from * around; join with sl st in first hdc. [88 sts]
Rnd 12: With G hook, ch 1, sc in same st as join, sk next st, v-st in next st, sk next st*, sc in next st; rep from * around ending last rep at **; join with sl st in first sc. [22 v-sts & 22 sc sts]
Rnd 13: Ch 4 (counts as first dc and ch-1 sp), (sc, ch 1) in v-st*, (dc, ch 1) in next sc; rep from * around ending last rep at **; join with sl st in first dc (3rd ch). [44 sts & 44 ch-1 sps]
Rnd 14: Ch 1, sc in same st as join, v-st in next sc*, sc in next dc; rep from * around ending last rep at **; join with sl st in first sc. [22 v-sts & 22 sc sts]
Rnds 15-23: Rep rnds 13 & 14 ending with Rnd 13 at Rnd 23.
Rnd 24: With E hook, ch 1, sc in same st as join and into each st and ch around. Fasten Off. [88 sts.]
Brim:
Row 1: With E hook and with RS facing: Join yarn to 33rd st from where you fastened off. Ch 1, 2 sc in next st, [sc in next 2 sts, 2 sc in next st] 7 times, sl st into next st. Turn. [30 sc sts]
Row 2: Ch 1, sk the sl st, 2 sc in first sc, [sc in next 3 sts, 2 sc in next st] 7 times, sc in last st, working into the band of hat, sc into next sc of hat, sl st into next st of hat. Turn. [39 sc sts]
Row 3: Ch 1, sk the sl st, 2 sc in first sc, sc in each sc across, skip the sl st, working into the band of hat, sc into next sc of hat, sl st into next st of hat. Turn. [41 sc sts]
Rows 4-8: Rep row 3. [51 sc sts]
Edging:
With RS facing, ch 1, sc evenly around; join with sl st in first sc. Fasten Off.
Crochet Hats
See All Crochet Hat Patterns.


Blossom Stitch – Photo Tutorial
This crochet cap pattern is started at the top of the head and worked down. The top is worked in solid half double crochet stitches until you get the diameter you need.
The body of the cap is worked in Crochet Blossom Stitch. Continue with the blossom stitch rounds until you have the height you need. The following tutorial shows how to crochet the stitch.

Step 1
Chain any multiple of 4. Join the first and last chains with a slip stitch being careful not to twist the chains.

Step 2
Rnd 1: Chain 1.

Step 3
Single crochet into the same chain as join and into each chain around.
Note: I worked into the back bumps, but you don’t have to.

Step 4
Rnd 2: Chain 1. Single crochet into the same stitch as where the join was made.
Skip the next stitch.

Step 5
Double crochet into the next stitch.

Step 6
Chain 1.

Step 7
Double crochet again into the same stitch.
Skip the next stitch.

Step 8
Single crochet into the next stitch.

Step 9
Repeat around.

Step 10
Chain 4. Counts as first double crochet and chain 1 space.

Step 11
Single crochet into chain 1 space. Chain 1.

Step 12
Double crochet into the next single crochet. Chain 1.

Step 13
Repeat around. Join with a slip stitch in the third chain.

Step 14
Rnd 4: Chain 1. Single crochet into the same stitch as join.

Step 15
Double crochet, chain 1, double crochet into next single crochet.

Step 16
Single crochet into the next double crochet.

Step 17
Repeat around. Join with a slip stitch.
Rep Rnds 3 and 4 until you have the height that you want.

Step 18
Final Rnd: Chain 1, single crochet into each stitch and chain around.
Join with a slip stitch and fasten off.
Blossom Stitch – Video Tutorial
This video shows how to make the blossom stitch in rows as well as in rounds.
Blossom Stitch Crochet Pattern Collection
The Blossom Stitch Crochet Pattern Collection is available in my Etsy Shop. Having all patterns in one download makes it easy to crochet up sets for gifting to friends and family members.
Get 25% off when you use coupon code: CNC25


want a simple beanie with a brim . Thank you , Mary D.