
How to Tie a Slip Knot for Crochet
This crochet tutorial shows how to tie a slip knot for starting your crochet projects. It is very easy to make, and it is the first step in learning how to crochet. I’ve included a video tutorial as well as a photo tutorial to make this easy for beginners.
What is a slip knot used for? The slip knot in crochet is used for starting a crochet project. It is one of the most secure ways to start any crochet project. It can be used for starting all types of projects, whether in rows or in rounds. Unlike the magic circle, which is used only for projects that are started in the round.

When done correctly, you never have to worry about your stitches coming undone. The short end, also known as the tail end of the yarn, is nice and tight, so it doesn’t come loose. And the working yarn is easy to slide over the crochet hook to the tension you want.
Once you know how to make a slip knot, the next step is to learn how to make the beginning chains and crochet into them.

Subscribe for Free Crochet Patterns, Coupons, and Other Crafty Promotions.
You will also receive a PDF copy of the Crochet Shawl Patterns – PDF Download.
Your email will not be shared. Unsubscribe at any time. By subscribing, you agree to our privacy policy and terms of use.
How to Make a Slip Knot for Crochet – Photo Tutorial
The first step is to make a loop with your yarn strand. You can make this loop around your thumb, index finger, or even around a couple of fingers, whichever comes naturally for you. Some crocheters will do it right on the hook. It looks super easy when they do it, but I’m more comfortable using my fingers.

Once you have your loop, take your working yarn and pull it through the loop. The working yarn is the ball end of the yarn that you’ll be crocheting with.

Next, take the short end and pull it tight.

This forms the knot and makes it secure so the tail end cannot come undone.

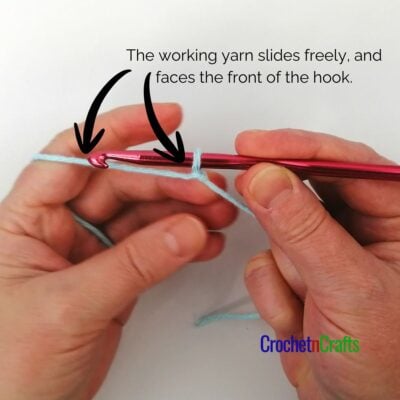
Then, with the working yarn on the left side and the yarn tail on the right side, place the loop on your hook and pull the working yarn tight. (If you are left-handed, you’ll need to reverse that.) You should now have a sliding knot that you can move back and forth.

And regardless of whether you are right or left-handed, the working yarn that freely slides should always be facing you when you start your crochet project. In other words, it should come around from the back of the hook and down on the front side of the hook. (This is also true when you’re in the middle of your crochet project, and you happen to drop your hook from the active loop. When you go to re-insert your hook, the sliding part of the loop with the working yarn is always facing you.)
And that’s it, that is all there is to making a slip knot! You are now ready to make your first stitch or crochet chain, whichever the pattern calls for.
How to Make a Slip Knot in Crochet – Video Tutorial
This video shows how to tie a slip knot in crochet. To make sure the video displays properly, please make sure you are not using an ad-blocker.


I know how to crochet just the beginning loop gave me trouble