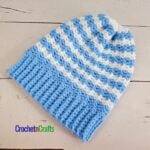
Alternating Chunky Slouch
I love the way the stitches work together in this alternating chunky slouch. It’s very easy and the hat works up super quick. I used a chunky yarn, but it would work well in a worsted weight yarn too. Just remember to switch to a larger hook when you begin working in the rounds. For some reason the hat got smaller on the rounds, so I switched to a larger hook.

One of my testers had a difficult time meeting the gauge. The gauge is not all that important because you can easily adjust the size in any multiple of two. The only thing to keep in mind is that you don’t want to crochet it too tight as it causes the hat to stand straight up. Personally, I think it looks nice when they stick up a bit… it makes it look like I’m still hiding my big ponytail, which I chopped off around the holidays.
Another tip from one of my testers was the invisible join to join each round. For me it’s too much work, so I do mine with a tight join. But I do admit, the invisible join is much cleaner and more professional looking. She put together a tutorial on her blog which you can see here: Invisible Join. You have to scroll down to the bottom for the tutorial.

Alternating Chunky Slouch
Skill Level
Materials
- Yarn: Loops & Thread Charisma Bulky yarn (5) in 2 colors. I used Taupe and Think Pink
- Crochet Hooks: 9mm & 10.00mm
- Tools: Measuring Tape, Scissors, Yarn Needle.
Measurements
- Gauge: 1.75" over 2 (hdc, sl st).
- Finished Size: Laying flat it measures 9" across and 11" from top to bottom. The height and width can be adjusted for a custom fit.
Abbreviations
- CA = Color A = Taupe
- CB = Color B = Pink
- Bl/bls = Back Loop/Back Loops
- Ch/Chs = Chain/Chains
- Fl = Front Loops
- Hdc = Half Double Crochet
- Hk = Hook
- Lp/Lps = Loop/Loops
- Rep = Repeat
- Sc = Single Crochet
- Sk = Skip
- Sl St = Slip Stitch
- St/Sts = Stitch/Stitches
- See the Crochet Abbreviations chart for more details.
Special Stitch Instructions
Notes
- This pattern is written in American Crochet Terms
- Each end of ribbing row equals 1 st.
Helpful Links
Instructions
Ribbing Rows:
- With CA and 9mm hk, Ch 7,
- Row 1: Sc in 2nd ch from hk and in each ch across. Turn. (6 sts)
- Row 2: Working in bl only, ch 1, sc in each st across. Turn.
- Rows 3-38: Continue with row 2 until you have reached a desired circumference making sure to end in an even number of rows.
- Ch 1 and join the ribbing rows by slip stitching the last row to the free lps of starting chs. You might have your own way of doing it, but I like to join the front lps of last row worked to the free lps of starting chs.
Begin working into the ends of the rows.
- Rnd 1: With 10mm hk ch 1, 2 sc in end of first row, sk next row, *2 sc in next row, sk next row; rep from * around; join with sl st in both lps of first sc. (38 sts)
- Rnd 2: With CB, ch 1, in same st as join hdc in fl only, in next st sl st in bl only, *hdc in fl only, sl st in bl only; rep from * around; join with sl st in both lps of first hdc. (38 sts)
- Rnd 3: With CA, in same st as join sl st in bl only, in next st hdc in fl only, *sl st in bl only, hdc in fl only; rep from * around; join with sl st in in both lps of first sl st.
- Rnds 4-17: Rep rnds 2 & 3 until you have reached a desired height ending with CA. Fasten Off at last rnd leaving a long enough tail to weave through last rnd to close beanie. I went into the back lps on every hdc st; then pulled it tight and weaved it in to secure.