
Seasonal Stripes Fingerless Gloves
These fingerless gloves are given in a small size. However, with a bit of know-how, and following the instructions within the pattern you could crochet these up to any size that you need.
It’s an intermediate pattern. It’s really not that hard to crochet though, but it does get a bit tricky to get the new colors started. See this tutorial for help in regards to the stitch pattern. The thumbhole also is a bit confusing, so I added lots of images to hopefully help with that.

The third downfall is having to carry all those colors up at each round. But if you can get past that, you’ll enjoy this pattern.
What I like about these gloves is that they are nice and stretchy. I attribute that to the yarn that I used. But, you could also make this in a thicker yarn if you wanted to. Just make sure to use a large enough hook to keep the fabric nice and loose.
Woolike
See More Woolike Crochet Patterns.


And if you like this, you might also enjoy more free patterns in the seasonal stripes collection. Or, check out this roundup, or visit the main category for more fingerless gloves crochet patterns.

Seasonal Stripes Fingerless Gloves
Skill Level
Materials
- Yarn: Loops and Threads Woolike #1 – Super Fine – 4 3.5oz balls – 1 of each color. I used colors: Tan, Chocolate, Sage and Golden Yellow.
- Crochet Hooks: E/3.00mm and G/4.00mm
- Tools: Measuring Tape, Scissors, Yarn Needle.
Measurements
- Gauge: 2" over12 sts/chs in pattern.
- Finished Size: Measures 3" across and 6" long. Can be increased to any size.
Abbreviations
- CA = Color A – Tan
- CB = Color B – Chocolate
- CC = Color C – Golden Yellow
- CD = Color D – Sage
- Bphdc = Back Post Half Double Crochet
- Ch/Chs = Chain/Chains
- FO = Fasten Off
- Fphdc = Front Post Half Double Crochet
- Fsc = Foundation Single Crochet
- Hdc = Half Double Crochet
- Prev = Previous
- Rep = Repeat
- Sc = Single Crochet
- Sk = Skip
- Sl St = Slip Stitch
- St/Sts = Stitch/Stitches
- Stfphdc = Standing Front Post Half Double Crochet – Refer to this tutorial.
- See the Crochet Abbreviations chart for more details.
- This pattern is written in American Crochet Terms
Notes
- CA is always worked on top of CA. It is never joined to the other colors, or worked on top of other colors. It has it's own rounds so to speak, and is worked every other round after rnd 10.
- CB is joined with a Standing Crochet stitch to the 2nd st of rnd 11. CB, CC, and CD are joined to each other at color changes, but never to CA.
- See Tutorial on Standing Crochet Stitches
- Yarn is carried up at each rnd.
- Please refer to this tutorial on how to work the stitch pattern, change to the new color and carry the yarn.
- To avoid a mess of the yarn, rearrange the yarn after each rnd.
Instructions
- Rnd 1: With CA and 3.00mm hook, fsc 34 (or any multiple of 2 to go around the hand & wrist); join with sl st in first fsc being careful not to twist sts.
- Rnd 2: Ch 1 (does not count as st now and throughout), hdc in same st as join and into each st around; join with sl st in first hdc. (34 sts)
- Rnd 3: Ch 1, fphdc in same st as join, bphdc in next st, *fphdc in next st, bphdc in next st; rep from * around; join with sl st in first fphdc. (34 sts)
- Rnds 4-8: Same as rnd 3.
- Rnd 9: With 4.00mm hook, Ch 1, (fphdc, ch 1) in same fphdc as join and into each fphdc around, (do not crochet into the bphdc’s.) Join with sl st in first fphdc. (17 fphdc) Pull the loop long and drop CA.
- Rnd 10: With CB, working in front of prev rnd and into bphdc sts made 2 rnds below, (stfphdc, ch 1) into first bphdc, (fphdc, ch 1) into next bphdc and into each bphdc 2 rnds below; join with sl st in first fphdc. (17 fphdc) Pull the loop long and Drop CB

- Rnd 11: With CA, *Working in front of previous rnd and into 2 rnds below, ch 1, (fphdc, ch 1) into first fphdc and into each fphdc 2 rnds below. Join with sl st in first fphdc. Pull the loop long and drop yarn.
- Rnd 12: Join CC to CB and Rep rnd 11 from * with CC.
- Rnd 13: With CA rep rnd 11.
- Rnd 14: Join CB to CC and rep rnd 11 from * with CB.
- Rnd 15: With CA rep rnd 11.
- Rnd 16: Join CD to CB and rep rnd 11 from * with CD.
- Rnd 17: With CA rep rnd 11.
- Rnd 18: Join CB to CD and rep rnd 11 from * with CB.
- Rnds 19-26: Rep rnds 11 to 18 once.

Thumbhole:
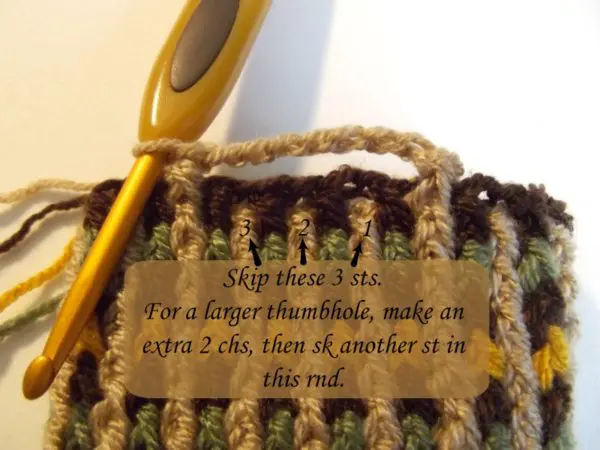
- Rnd 27: With CA, Working in front of previous rnd and into 2 rnds below, ch 1, fphdc in first fphdc, ch 7, sk next 3 fphdc in current rnd (see image below), (fphdc, ch 1) into next fphdc and into each fphdc 2 rnds below. Join with sl st in first fphdc. (14 fphdc) Pull the loop long and drop CA. Note: For a larger thumbhole, ch 9 and sk 4 fphdc below etc.
- Rnd 28: Join CC to CB, and working into the chs made in prev rnd, ch 1, (hdc, ch 1) in first ch, [sk next ch, (hdc, ch 1) in next ch] 3 times (see first image below); working in front of prev rnd and into 2 rnds below, (fphdc, ch 1) into each fphdc 2 rnds below (see second image below). Join with sl st in first hdc. (4 hdc and 13 fphdc) Pull the loop long and drop CC.
- Rnd 29 (see image below): With CA, Working in front of prev rnd and into 2 rnds below, ch 1, (fphdc, ch 1) in first fphdc, working in front of prev rnd, (hdc, ch 1) in next 3 unworked chs. (fphdc, ch 1) into next fphdc and into each fphdc 2 rnds below. Join with sl st in first fphdc. (14 fphdc, and 3 hdc) Pull the loop long and drop CA.
- Note: See image below to help with rnds 30-31.
- Rnd 30: Join CB to CC and Working in front of prev rnd and into 2 rnds below, ch 1, (fphdc, ch 1) into first 4 hdc, (fphdc, ch 1) in next fphdc and into each fphdc 2 rnds below. Join with sl st in first fphdc. (17 fphdc) Pull the loop long and drop CB.
- Rnd 31: With CA Working in front of prev rnd and into 2 rnds below, ch 1, (fphdc, ch 1) into first fphdc, (fphdc, ch 1) in next 3 hdc, (fphdc, ch 1) in next fphdc and into each fphdc 2 rnds below. Join with sl st in first fphdc. (17 fphdc) Pull the loop long and drop CA.
- Rnd 32: Join CD to CB and rep rnd 11 from * with CD.
- Rnd 33: With CA rep rnd 11.
- Rnd 34: Join CB to CD and rep rnd 11 from * with CB.
- Rnd 35: With CA, rep rnd 11.
- Rnd 36: Join CC to CB and Rep rnd 11 from * with CC. FO CC and other colors except CA.
- Rnd 37: With CA rep rnd 11.
- Rnd 38: With CA and 3.00mm hook, work the last rnd into fphdc sts of rnds 36 & 37, ch 1, fphdc in each st around; join with sl st in first fphdc. (34 fphdc)
- Rnd 39: Ch 1, sc in same st as join and into each st around; join with sl st in first sc. FO.


Thumbhole Edging:
- Rnd 1: With 3mm hook and working into the last 2 rnds of the gloves, join CA with sl st to base of post on one side as shown:
- Turn glove and working into top two rounds, work 1 fphdc in each of next 7 sts across to side (see first image below); sl st in side post as shown (see second image below);
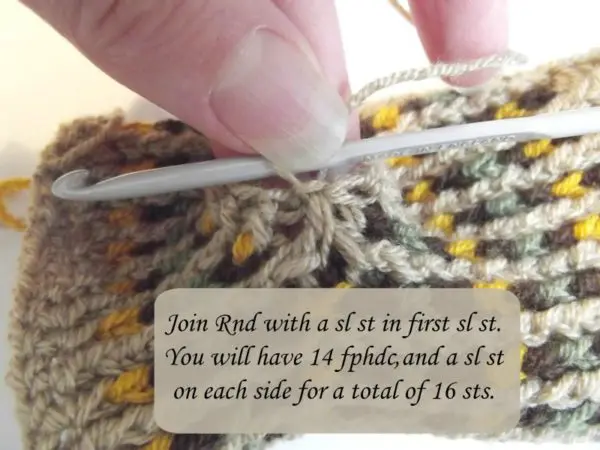
- Working on opposite side of thumbhole and into the top two rounds, fphdc in each of next 7 sts across; join with sl st in first sl st. (14 fphdc sts and 2 sl sts.)
- Rnd 2: Ch 1, sc in first st and in each st around; join with sl st in first sc. (16 sc) FO.


Crochet Fingerless Gloves
See All Crochet Fingerless Gloves Patterns.


crochetpatternbonanza.com


