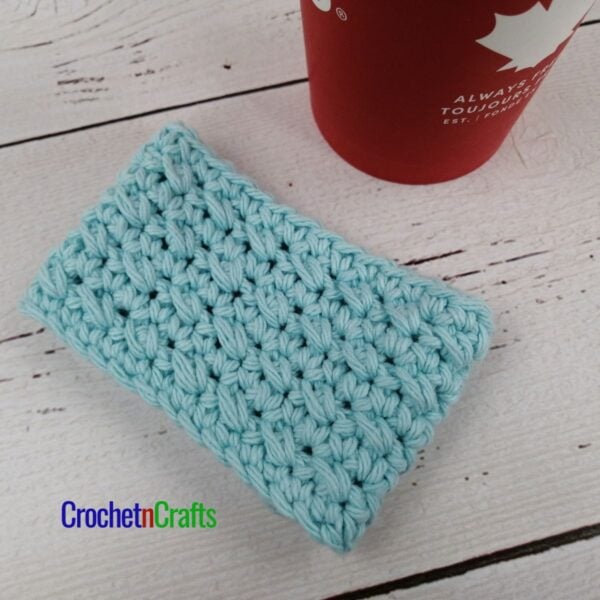
Puff Stitch Mug Cozy
Here is my pattern for a mug cozy. It’s crocheted up with the same stitch as was used in the placemat, dishcloth and coaster patterns.
Why use a mug cozy? Because it serves as a coaster as well as an insulator to help keep your cup of tea (or coffee) nice and warm. And what I really like about it is that you don’t have to remember to place the mug on a coaster after each sip. Just slip the cup into the cozy and away you go.

I attached a crocheted button to help keep the cozy in place, but any button will work if you’d rather have a smaller or fancier one.
The Yarn
Bernat Handicrafter Cotton is a good choice, but any similar yarn will work with this. I used leftovers from a big ball.
Bernat Handicrafter Cotton


The Stitch Pattern
This pattern is worked with a slanted puff stitch for a nice thick fabric and pretty textures.
Some Images to Show How to Work Into Ch-2 Sp of Puff St:
Please note that these images were taken while working on another pattern, however, the concept is the same.
 Sl St Into Ch-2 Sp of Puff St
 Sl St Made
 Puff Stitch Made
Puff Stitch Mug Cozy
Skill Level
Materials
- Yarn: Bernat Handicrafter Cotton (Worsted Weight, #4; 100% Cotton; 1.75 oz/50g; 80yds/73m)
- Crochet Hooks: H/8-5.00mm & G/6-4.25mm
- Other: Measuring Tape, Scissors, Yarn Needle.
Measurements
- Gauge: 2" over 2 puff sts and over 5 rows.
- Finished Size: Fits a 3.25" diameter mug.
Abbreviations
- Puff St = Puff Stitch
- Ch/Chs = Chain/Chains
- FO = Fasten Off
- Hdc = Half Double Crochet
- Hk = Hook
- Lp/Lps = Loop/Loops
- Rnd/Rnds = Round/Rounds
- Sc = Single Crochet
- Sk = Skip
- Sl St = Slip Stitch
- Sp/Sps = Space/Spaces
- St/Sts = Stitch/Stitches
- YO = Yarn Over
- Crochet Abbreviations and Terms are in American.
Special Stitch Instructions
- Puff St: Ch 2, (Yo, insert hk in st or sp indicated, yo and pull through) 2 times, 5 lps on hook, yo and pull through all 5 lps, ch 1.
Instructions
- Rnd 1: With H/8-5.00mm hk, Ch 2, work 8 sc into 2nd ch from hk; do not join but continue to work in a continuous rnd. Place st marker in last st made of each rnd in order to keep track. (8 sts)
- Rnd 2: Work 2 sc in each st around. (16 sts)
- Rnd 3: (Sc in next st, 2 sc in next st) around. (24 sts)
- Rnd 4: (Sc in next 2 sts, 2 sc in next st) around. (32 sts)
- Rnds 5-7: Sc in each st around.
Begin Working in Rows
- Row 1: Sl st into next st, ch 1, sc in first 2 sts, ch 2, sk next st, sc in next st, (ch 2, sk next 2 sts, sc in next st) 8 times, ch 2, sk next st, sc in next 2 sts, leave last st unworked; turn. (10 ch-2 sps)
- Row 2: Ch 1, hdc in first st, sc in next st, ch 2, sk first ch sp, (sl st into next ch-2 sp, work puff st in same ch-2 sp) 8 times, ch 1, sk last ch-2 sp, sc in next st, hdc in last st; turn. (8 puff sts made)
- Row 3: Ch 1, sc in first st, hdc in next st, ch 2, sk first ch sp, (sl st into ch-2 sp of next puff st, work puff st in same ch-2 sp) 8 times, ch 1, sk last ch-2 sp, hdc in next st, sc in last st. (8 puff sts)
- Row 4: Ch 1, hdc in first st, sc in next st, ch 2, sk first ch sp, (sl st into ch-2 sp of next puff st, work puff st in same ch-2 sp) 8 times, ch 1, sk last ch-2 sp, sc in next st, hdc in last st; turn. (8 puff sts made)
- Rows 5-9: Rep rows 3 & 4.
- Row 10: Ch 1, sc in first 2 sts, sc in ch sp, (sc in top of next puff st, 2 sc in ch-2 sp of same puff st) 8 times, 2 sc into last ch-2 sp, sc into last 2 sts; (31 sts) Ch 10 for button loop, sl st into top of last sc st made. FO.
Button:
- Rnd 1: With G/6-4.25mm hk, Ch 2, work 8 sc into 2nd ch from hk, place st marker in last st made.
- Rnd 2: Work 1 sc in each st around.
- Rnd 3: Encase rnd 2 by working 1 sc into each st of rnd 1. FO leaving a long tail for sewing.
- Weave the tail end through the sts of rnd 3. Pull the tail tight and sew button onto top corner of mug on opposite corner from the loop.