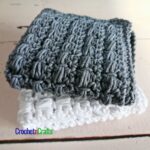
Slanted Puff Crochet Stitch
This is my version of the slanted puff crochet stitch. It is a beautiful stitch pattern for just about anything from the kitchen and other home decor projects to blankets, clothing, and more.
This tutorial assumes you know how to make the basic crochet stitches as well as the puff stitch. The purpose of this tutorial is to show how to work the puff stitch in a slant or a beautifully textured fabric.
You can modify the stitch in terms of how many wraps you make for the puff stitch, thus, increasing the textures if you want.
Subscribe for Free Crochet Patterns, Coupons, and Other Crafty Promotions.
Your email will not be shared. Unsubscribe any time. By subscribing you agree to our privacy policy and terms of use.
Written Pattern
The written pattern includes a stitch multiple for your starting chains, which makes it super easy to crochet this pretty stitch into anything from a blanket to a pillow, a cozy cardigan and so much more!
Abbreviations
- Puff St = Puff Stitch
- Ch/Chs = Chain/Chains
- Hdc = Half Double Crochet
- Hk = Hook
- Lp/Lps = Loop/Loops
- Rep = Repeat
- Sc = Single Crochet
- Sk = Skip
- Sl St = Slip Stitch
- Sp/Sps = Space/Spaces
- St/Sts = Stitch/Stitches
- YO = Yarn Over
Puff Stitch Instructions
(Yo, insert hk in sp indicated, yo and pull through) 2 times, 5 lps on hk, yo and pull through all 5 lps.
Loosely ch any multiple of 3 plus 2.
Row 1: Sc in 2nd ch from hk and into each ch across. Turn.
Row 2: Ch 1, sc in first 2 sts, ch 1, sk next st, sc in next st, *ch 2, sk next 2 sts, sc in next st; rep from * across to last 3 sts, ch 1, sk next st, sc in last 2 sts. Turn.
Row 3: Ch 1, hdc in first 2 sts, ch 1, sk first ch-1 sp, *(sl st, ch 2, puff st, ch 1) into next ch-2 sp and into each ch-2 sp across to last ch-1 sp, sk ch-1 sp, hdc in last 2 sts. Turn.
Rows 4-10, (22, 28): Rep row 3.
Last Row: Ch 1, sc in first 2 sts, sc in ch-1, sc in top of next puff st, 3 sc in next ch-2 sp and into each ch-2 sp across to lasts ch-1 sp; sc into ch-1, sc into last 2 sts;
Photo Tutorial
The first image below shows the first two rows done as per the pattern above. You can see the chain one spaces at the beginning and end of rows. These are marked off in the yellow stitch markers and are skipped throughout the pattern.
The chain two spaces in the middle are marked off with blue stitch markers.
To begin the row with slanted puff stitches: Ch 1, 2 hdc in first 2 sts, ch 1.
Skip the ch-1 sp. Sl st in first ch-2 sp.
Ch 2.
Then work the puff stitch into same chain.
Ch 1. If you are new to crochet, mark the ch-2 made just before the puff stitch to make it easier for the next row.
Then repeat the steps above: (sl st, ch 2, puff st, ch 1) into next ch-2 sp and into each ch-2 sp across to ch-1 sp; sk ch-1 sp, hdc in last 2 sts.
The next row is the same, except now you are working into the ch-2 sps made just before the puff stitches.
Ch 1, hdc in first 2 sts, ch 1.
Skip the first ch-1, sl st into next ch-2 sp.
Ch 2.
Work puff st into same ch-2 sp, ch 1.
And again, repeat that across: (sl st, ch 2, puff st, ch 1) into next ch-2 sp and into each ch-2 sp across to ch-1 sp; sk ch-1 sp, hdc in last 2 sts.
Video Tutorial
The following video shows how to make the slanted puff crochet stitch from start to finish.


