
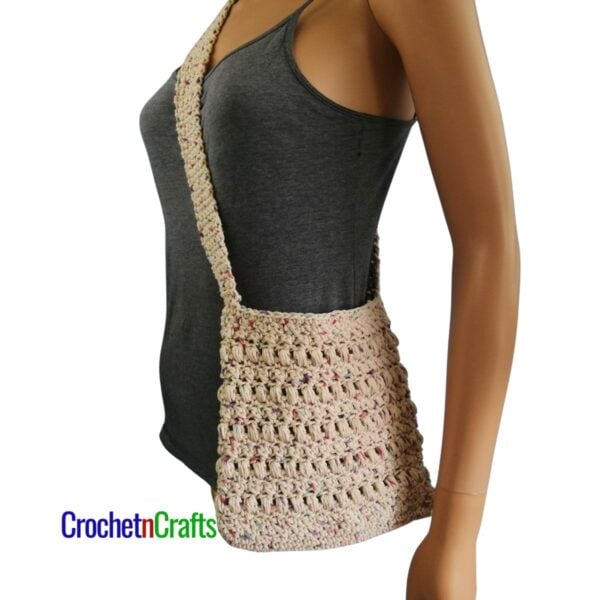
Small Purse Crochet Pattern – Seeds and Puffs
This is a free crochet pattern for a small puffy seed stitch purse. The seed stitch is made using the single and double crochet stitches. Both stitches are easy to make and suitable for a beginner; however, the puff stitch is more suitable for someone at the intermediate crochet level.
The strap is worked in a continuous round in order to add more strength to it. But if you wanted to, you could work it in rows with 5 stitches and then line it with a strong material once the purse is finished.
Here is a tutorial on how to line a crochet bag. You might also be interested in adding this purse closure.


Subscribe for Free Crochet Patterns, Coupons, and Other Crafty Promotions.
You will also receive a PDF copy of the Beads and Diamonds Purse pattern.
Your email will not be shared. Unsubscribe any time. By subscribing, you agree to our privacy policy and terms of use.
Small Purse Crochet Pattern Instructions
Skill Level: Intermediate
Materials
- Yarn: Patons Canadiana – The New Generation. Or any other medium worsted-weight yarn. Approximately 200 grams.
- Hook Size: H/8-5.00mm
- Notions: 2 metal purse rings, 1 zipper
Measurements
- Gauge: 2.5” over 9 sts and across the first 4 rnds.
- Finished Size: When laying flat, it measures about 8.5” high by 10.5” wide.
Abbreviations
- RS = Right Side
- WS = Wrong Side
- Ch/Chs = Chain/Chains
- Dc = Double Crochet
- Fl = Front Loops
- FO = Fasten Off
- Hdc = Half Double Crochet
- Hk = Hook
- Lp/Lps = Loops/Loops
- Rep = Repeat
- Rnd/Rnds = Round/Rounds
- Sc = Single Crochet
- Sk = Skip
- Sl St = Slip Stitch
- Sp/Sps = Space/Spaces
- St/Sts = Stitch/Stitches
- YO = Yarn Over
Special Stitch Instructions
Puff St: (Yo, insert hk in sp indicated, yo and pull through) 4 times, 9 lps on hook. Yo and pull through all 9 lps.
Small Purse Crochet Pattern Instructions
Rnd 1: Ch 28, sc in 2nd ch from hk and into next 25 chs, 3 sc in last ch. Working on the opposite side, sc in free lps of next 25 chs, 2 sc in last ch. Join with sl st in first sc. [56 sts]
Rnd 2: Ch 1, 3 hdc in same st as join, *hdc in next 25 sts, 3 hdc in next st, hdc in next st*, 3 hdc in next st; rep from * to * once. Join with sl st in first hdc. [64 sts]
Rnd 3: Ch 1, sc in same st as join, *3 sc in next st, sc in next 27 sts, 3 sc in next st*, sc in next 3 sts; rep from * to * once, then sc in last 2 sts. Join with sl st in first sc. [72 sts]
Rnd 4: Ch 1, hdc in same st as join and into next st, *3 hdc in next st, hdc in next 29 sts, 3 hdc in next st*, hdc in next 5 sts; rep from * to * once, then hdc in next 3 sts. Join with sl st in first hdc. [80 sts]
Rnd 5: Ch 1, (sc, dc) in same st as join, *sk next st, (sc, dc) in next st; rep from * around to last st, sk last st. Join with sl st in first sc. [80 sts]
Rnd 6: Sl st into next st, ch 1, (sc, dc) in same st, *sk next st, (sc, dc) in next st; rep from * around. Join with sl st in first sc. [80 sts]
Rnd 7: Sl st into next st, ch 1, (sc, ch 1) in same st, *sk next st, (sc, ch 1) in next st; rep from * around. Join with sl st in first sc. [40 ch-1 sps]
Rnds 8: Sl st into ch-1 sp, ch 1, (puff st, ch 1) in same sp and in each sp around. Join with sl st in first puff st. [40 puff sts]
Rnd 9: Ch 1, (sc, ch 1) in same st as join, sk ch-1 sp, *(sc, ch-1) in next st, sk next ch-1 sp; rep from * around. Join with sl st in first sc. [40 ch-1 sps]
Rnd 10: Ch 1, (sc, dc) in first st, *sk next ch-1 sp, (sc, dc) in next st; rep from * around to last ch; sk last ch-1. Join with sl st in first sc. [80 st]
Rnds 11-26: Rep Rnds 7-10.
Rnd 27: Sl st into next st, ch 1, (sc, dc) in same st, sk next st, sc in next st, *sk next st, (sc, dc) in next st, sk next st, sc in next st; rep from * around. Join with sl st in first sc. [60 sts]
Rnd 28: Ch 1, sc in same st as join and into each st around. Join with sl st in first sc. FO. [60 sts]
Handle
Work 5 sc into one ring. Turn.

Begin Working in Rounds
Rnd 1 (RS): Ch 1, working in fl only, sc in first st and in each st across. [5 sts] Turn. Working on the opposite side and into the free lps (or unworked back lps), sc in each free lp across. Do not join. [10 sts]

Rnd 2: Working in both lps, sc in next st and into each st around; Do not join.
Continue with Rnd 2, working in a continuous round until the handle is long enough. Do not FO.
You can remove the twist of the handle by blocking it. After blocking, make sure that the last st falls along the edge of the strap. You might have to undo or do a couple more stitches in order for it to line up.
Closing Stitches (RS): Turn work so the right side is facing. Then, working through both front and back sts, sc across. Turn. [5 sts]

The last 5 sts close the handle, which is now ready to be joined to the second ring. Do Not FO.

Joining Row (WS): Ch 1, working in both lps and into metal ring, sc in first st and in each st across. FO. [5 sts]
Attaching Handle to Purse
Lay the purse flat. Find and mark off the 5 sts along the fold on each side.

With RS facing, work 5 sc stitches into the first ring. Do not FO.

With the right sides of the purse and handle facing each other, ch 1, join the sts in the ring with sl sts to the 5 sts on the purse. FO. Rep on the other side, being careful not to twist the handle.

More Crochet Bag Patterns
See More Crochet Bag Patterns.


How much yarn should I purchase for this project?
Sorry, I can’t remember how much I used, but I would say at least two balls.
hola puede poner los graficos de la puntada de la bolsa no entiendo bien la explicacion al traducira…gracias
I’m hoping to learn how to do that sometime in the next year. No promises, but it is on my list. Thanks so much for your patience. :)
Thankyou. Was looking to make one for a gift. This looks ideal.
You’re welcome. I’m glad you like it :)
How many skeins of yarn should I buy to make this purse?
Beth, I’m sorry I didn’t write it down. It’s either one or two, so I would buy two just in case. You can always return the 2nd if you don’t need it.
I bought extra to be sure I have enough. Thanks!
I keep ending round 3 with 79 stitches and not sure where I’m going wrong :(
Sophie, I’m not sure, it’s hard to know without a clear image. If you could send me a clear image of your work at crochetncrafts@gmail.com that would be awesome. Thanks. :)
I love this bag. I like the look of the two stitches and the solid look of the strap