Simple Lace Crochet Scarf Pattern

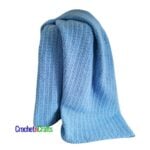
This simple lace crochet scarf pattern is perfect for transitional weather. Crochet it up in your favorite seasonal colors and wear it over your shirt or sweater or even under a jacket if you like. The lightweight yarn gives it a beautiful drape that’ll compliment just about any outfit.

It has a lot of stretch lengthwise, but it’s super easy to adjust if you need it shorter. As for the width, it can be adjusted as well in the stitch multiple provided. Therefore, you can quickly and easily make this for toddlers and up.
As is, it’s the perfect length for a full wrap and still have a good amount draping down on each side.
I crocheted mine up in a solid color, but since it’s worked in simple rows you could easily go through your stash and work this up in your favorite striped design. Another option would be to run the rows vertically instead of horizontally for a totally different look.
Purchase Your Ad-Free PDF

Simple Lace Crochet Scarf Pattern
Skill Level
Materials
- Yarn: Red Heart Comfort Sport (Light, #3; 100% Acrylic; 12.35oz/350g; 1144yds/1050m) Color: Butter, 1 ball.
- Crochet Hook: H 5.00mm
- Other: Measuring Tape, Scissors, Yarn Needle.
Measurements
- Gauge: 14 sts = 4".
- Finished Size: 9.5" by 78"
Abbreviations
- Ch/Chs = Chain/Chains
- Dc = Double Crochet
- Rep = Repeat
- Sc = Single Crochet
- Sk = Skip
- Sp/Sps = Space/Spaces
- St/Sts = Stitch/Stitches
Instructions
- Ch 35, or any multiple of 6 + 5.
- Row 1: Working into back bumps, sc in 2nd ch from hook and into each ch across. Turn [34 sts]
- Row 2: Ch 2 (does not count as st, now and throughout), dc in first st and into each st across. Turn [34 sts]
- Row 3: Ch 1, sc in first 4 sts, *ch 2, sk next 2 sts, sc in next 4 sts; rep from * across. Turn [24 sts and 5 ch-2 sps]
- Row 4: Ch 2, dc in first 2 sts, ch 1, sk next 2 sts, work 4 dc in ch 2 sp, *ch 2, sk next 4 sts, 4 dc in next ch-2 sp; rep from * across to last 4 sts, ch 1, sk next 2 sts, dc in last 2 sts. Turn [24 sts, 4 ch-2 sps, 2 ch-1 sps]
- Row: 5: Ch 1, sc in first st and into each st and ch across. Turn [34 sts]
- Row 6-189: Rep rows 2-5.
- Row 190: Rep row 2.
- Row 191: Ch 1, sc in first st and into each st across. Fasten off, or continue with an optional edging.
Optional Edging
- Working from right side, ch 1, sc evenly around working 3 sc in each corner; join with slip stitch in first sc. Fasten Off.
Other Patterns to Check Out:
- Clustered V-St Crochet Spring Scarf
- Half Double and V-Stitch Easy Crochet Scarf
- Stashbuster Crochet Striped Scarf
- Slanted Puff Stitch Textured Crochet Scarf
- Slanted Puff Stitch Textured Crochet Scarf