
Crochet Tote Bag Pattern

This crochet tote bag pattern features a pretty, yet very simple, stitch pattern. It’s mindless to work on once you get past the bottom, making it great for relaxing after a long hard day. And when you have something relaxing to work on, it makes it the perfect pattern for making gifts!

Use this as a market tote bag, a beach bag or as an everyday bag to hold all your stuff.
The Yarn
A worsted weight cotton yarn is one of my favorite yarns for making crochet bags, but if you add a lining, you can basically choose whatever yarn you like best. For this tote bag crochet pattern I used Lily Sugar ‘n’ Cream, but Bernat Handicrafter Cotton and other similar cottons work just as well.


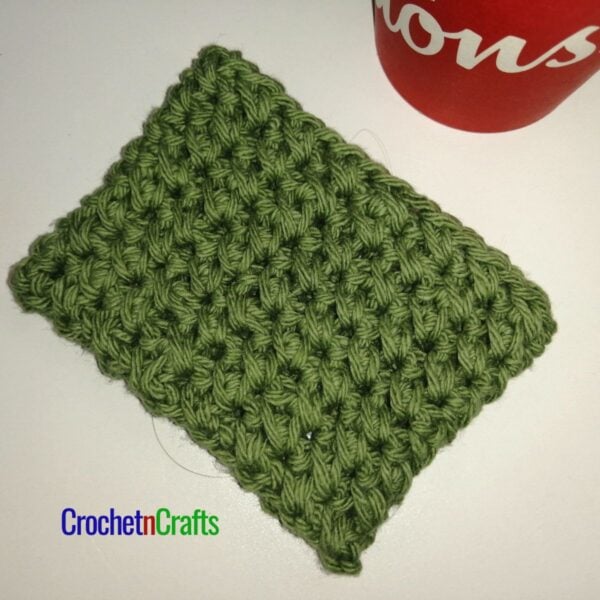
How It’s Made
This free crochet tote bag pattern is worked up in the double crochet, single crochet, and the double crochet cross stitch. It’s very simple, yet a nice stitch pattern that you’ll enjoy showing off after you line it.


The bag is worked from the bottom up, and in one piece too, so there’s no extra ends to weave in. With that said, you could probably add in a few rows of color to make it a bit more cheerful.
The Bottom. The bottom is started with a series of chains. You single crochet on both sides of these chains to start the first round for a rectangle. Here is a tutorial: Working on Opposite Side of Chain
Continue with the rounds, increasing by eight stitches in each round until you have reached a desired size for the bag bottom.
The Body. The body is then worked with the cross stitches, single crochets and double crochets. This is the mindless, and my favorite part of the bag.
The Straps. The straps or handles are worked in one piece with the bag. The pattern gives instructions on how to count off for the handle rounds, but if you need a visual you can follow this tutorial: How to Make Crochet Bag Handles The tutorial also provides you with a formula that you can use for any bag size.
Lining Your Bag
Lining your bag not only makes it more durable by preventing stretch, but it just looks more professional as well. See this tutorial: Lining a Crochet Purse
Purchase Your Printable PDF

Crochet Tote Bag Pattern
Skill Level
Materials
- Yarn: Lily Sugar 'N Cream Yarn – Cone (Worsted Weight, #4; 100% Cotton; 400g/14oz; 645 meters/706yds) Color: Sage, 1 cone
- Crochet Hook: H 5.00mm
- Other: Measuring Tape, Scissors, Yarn Needle.
Measurements
- Gauge: 10 sc sts = 3".
- Finished Size (Laid Flat): 17" wide by 14" high not counting the handles.
Abbreviations
- Ch/Chs = Chain/Chains
- Dc = Double Crochet
- Rep = Repeat
- Rnd/Rnds = Round/Rounds
- Sc = Single Crochet
- Sk = Skip
- Sl St = Slip Stitch
- St/Sts = Stitch/Stitches
Instructions
- Rnd 1: Loosely ch 28, sc in 2nd ch from hook and into next 25 chs, 3 sc in last ch. Working on opposite side of starting chs, sc in free loops of next 25 chs, 2 sc in last ch; join with sl st in first sc. [56 sts]
- Rnd 2: Ch 1, 3 sc in same st as join, *sc in next 25 sts, 3 sc in next st, sc in next st *, 3 sc in next st; rep from * to * once; join with sl st in first sc. [64 sts]
- Rnd 3: Ch 1, sc in same st as join, *3 sc in next st, sc in next 27 sts, 3 sc in next st *, sc in next 3 sts; rep from * to * once, then sc in last 2 sts; join with sl st in first sc. [72 sts]
- Rnd 4: Ch 1, sc in same st as join and into next st, *3 sc in next st, sc in next 29 sts, 3 sc in next st *, sc in next 5 sts; rep from * to * once, then sc in last 3 sts; join with sl st in first sc. [80 sts]
- Rnd 5: Ch 1, sc in same st as join and into next 2 sts, *3 sc in next st, sc in next 31 sts, 3 sc in next st *, sc in next 7 sts; rep from * to * once, then sc in last 4 sts; join with sl st in first sc. [88 sts]
- Rnd 6: Ch 1, sc in same st as join and into next 3 sts, *3 sc in next st, sc in next 33 sts, 3 sc in next st *, sc in next 9 sts; rep from * to * once, then sc in last 5 sts; join with sl st in first sc. [96 sts]
- Rnd 7: Ch 1, sc in same st as join and into next 4 sts, *3 sc in next st, sc in next 35 sts, 3 sc in next st *, sc in next 11 sts; rep from * to * once, then sc in last 6 sts; join with sl st in first sc. [104 sts]
- Rnd 8: Ch 1, sc in same st as join and into next 5 sts, *3 sc in next st, sc in next 37 sts, 3 sc in next st *, sc in next 13 sts; rep from * to * once, then sc in last 7 sts; join with sl st in first sc. [112 sts]
- Rnd 9: Ch 1, sc in same st as join and into each st around; join with sl st in first sc. [112 sts]
- Rnd 10: Ch 2 (does not count as st, now and throughout), dc in same st as join and into each st around; join with sl st in first dc. [112 sts]
- Rnd 11: Ch 1, sc in same st as join and into each st around; join with sl st in first sc. [112 sts]
- Rnd 12: Sl st into next st, ch 2, dc in same st, backtrack and dc in same st as join, *sk next st, dc in next st, backtrack and dc in skipped st; rep from * around; join with sl st in first dc. [112 sts, OR 56 cross stitches]
- Rnds 13-39: Rep Rnds 9 to 12, ending with Rnd 11 at Rnd 39. [112 sts]
Handles
- Lay the bag flat to place your markers for the handles. Count over 18 sts on the sides of the bag and place stitch marker in 19th stitch. Counting the stitch markers, you should have 20 sts marked off in the middle. Do the same on the other side. Stitch markers should align on each side of the bag. Do not crochet into the 20 stitches in the middle.
- Rnd 40: Ch 1, sc in same st as join and into each st up to marked st, *loosely ch 60 (or any number depending on how long or short you want the handles), sk the 20 sts marked off in the middle *, sc in next 36 sts; rep from * to * once; then sc in remaining sts; join with sl st in first sc. [72 sts and 120 chs]
- Rnd 41: Ch 1, sc in same st as join and into each st and ch around; join with sl st in first sc. [192 sts]
- Rnds 42-46: Ch 1, sc in same st as join and into each st around; join with sl st in first sc. [192 sts] Fasten Off.
- The video below shows how to do the handles.


I love this bag so, of course, I’m trying to make it. I’ve started it and frogged it at least 5 times because I always have one stitch left at the end….it’s not the ch1 (I can see that is there), it’s an actual chain/stitch that there is no instruction for. Any ideas?
Hi Bee, It could just be your joining slip stitch from the previous rounds and doesn’t require that you work into it. Placing a stitch marker in the first and last stitches made in each round can help to see the stitches better. If that is not it, could you send a picture please and thank you?
Beautiful pattern and very well written. Easy to follow. Thank you!
Thank you Jennifer!
I started learning crochet in February (it’s currently early May). I’ve been struggling with projects in the round, as my joins have always felt off. This pattern was the first pattern to really make joining in the round *click* for me. And I learned a new stitch! The project works up quick and I had a lot of fun making my first one. I’m already making another!
Hi JB, I’m glad you were able to work this up as a beginner. :) Thank you so much for the feedback.