
Circle In a Square Crochet Pattern for a Baby Afghan
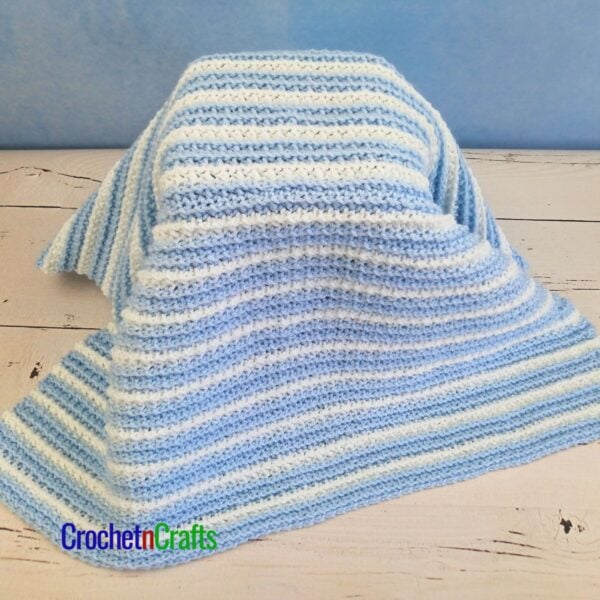
Use this circle in a square crochet pattern to make a baby afghan or a full-sized blanket. For the baby blanket I used 36 squares, but you can continue to add as many as you like until you have

I found this to be quite a bit of work due to the stitch pattern used. Each square is started off in a circle, then worked into a square over the last few rounds.
This crochet square has a beautiful lace and texture showing on the right side. On the wrong side, however, it’s not so pretty. To remedy that you can line the back with a fleece or another cozy piece of fabric.


Subscribe for Free Crochet Patterns, Coupons, and Other Crafty Promotions.
You will also receive a PDF copy of the Chunky Crochet Lapghan pattern.
Your email will not be shared. Unsubscribe any time. By subscribing, you agree to our privacy policy and terms of use.

Circle In a Square Crochet Pattern for a Baby Afghan
Skill Level
Materials
- Yarn: Loops and Threads Snuggly Wuggly Big! 14oz/396g ball – 2 Colors.
- Crochet Hook: G/4.00mm
- Other: Scissors, Yarn Needle.
Measurements
- 1 square measures 5.25" and the finished blanket measures approximately 35" by 35" with 36 squares.
Abbreviations
- CA = Color A
- CB = Color B
- Bet = Between
- Ch/Chs = Chain/Chains
- Cl = Cluster
- Dc = Double Crochet
- FO = Fasten Off
- Fpdc = Front Post Double Crochet
- Hdc = Half Double Crochet
- Hk = Hook
- Lp/Lps = Loop/Loops
- Puff St = Puff Stitch
- Rep = Repeat
- Rnd/Rnds = Round/Rounds
- Sc = Single Crochet
- Sk = Skip
- Sl St = Slip Stitch
- Sp/Sps = Space/Spaces
- St/Sts = Stitch/Stitches
- YO = Yarn Over
- Crochet Abbreviations and Terms are in American.
Special Stitch Instructions
- Puff St: (Yo, insert hk in sp indicated, yo and pull through) 3 times, 7 lps on hook. Yo and pull through all 7 lps, ch 1 to secure.
Notes
- When the pattern says (puff st, ch 1), work the puff stitch as instructed and secure with a chain 1. Then make another chain for a total of two chains.
- I carried my yarn at the back in order too avoid unnecessary loose ends.
Instructions
- Rnd 1: With CA, Ch 2, (hdc, ch 1) 8 times into 2nd ch from hk; join with sl st to first hdc. (8 ch-1 sps)
- Rnd 2: Sl st into next ch-1 sp, ch 1, (puff st, ch 1) in same ch-1 sp and into each ch-1 sp around; join with sl st to first puff st. (8 puff sts)
- Rnd 3: Join CB in sp bet next puff st, ch 1, sc in same sp, fpdc around corresponding hdc below, sc once more into same sp, ch 3, *sc in next sp, fpdc around corresponding hdc below, sc once more into same sp, ch 3; rep from * around; join with sl st to first sc. (8 ch-3 lps)
- Rnd 4: Join CA in first fpdc, ch 1, sc in same st, Working at the back of the ch-3 lp, work 4 dc into puff st, *sc into next fpdc, 4 dc into next puff st; rep from * around; join with sl st to first sc. (40 sts)
- Rnd 5: Ch 1, sc in same st as join, *ch 3, going in underneath and catching the ch-3 lp of rnd 3, sk next 2 dc, sc in sp before next dc (See illustrations 1-3 below), ch 3**, sc in next sc; rep from * around ending last rep at **; join with sl st to first sc. (16 ch-3 lps)
- Rnd 6: Join CB in next lp, ch 1, (sc, ch 3) into same lp and into each lp around; join with sl st to first sc. (16 ch-3 lps)
- Rnd 7: Sl st into ch-3 lp, ch 1, (sc, ch 4, sc) in same lp, ch 3 *(sc in next lp, ch 3) 3 times**; (sc, ch 4, sc) in next lp, ch 3; rep from * around ending last rep at **; join with sl st to first sc. (20 lps)
- Rnd 8: Sl st into next lp, ch 3 (counts as first dc), work another 6 dc into same lp, *(3 dc in next lp) 4 times**, 7 dc in next lp; rep from * around ending last rep at **; join with sl st to first dc. (76 sts) FO.


Joining Rounds:
- Squares are joined using the flat-braid method.
- First Square: Join CA to any corner st, ch 1, *(sc, ch 5, sc) into corner st, ch 3, [sk next 3 dc, sc in sp before next dc, ch 3] 5 times, sk next 3 dc; rep from * around; join with sl st to first sc. FO.
Tips
- When joining 2 or more squares, the dropped lp is picked up from the corresponding lp of the completed square. The hook is inserted from the top (right side) of the completed square. For this pattern, always start the joining at a corner.
- When joining at a corner where 3 corners have already been joined, pick up the dropped lp in the first corresponding corner lp, ch 2, drop the lp once more, and pick it up from the next corner lp of corresponding square (the corner lp of the square to the top left that corresponds to the next side of the current square).
Joining 1 Side:
- Join CA to any corner st, ch 1, *(sc, ch 5, sc) into corner st, ch 3, [sk next 3 dc, sc in sp before next dc, ch 3] 5 times, sk next 3 dc, rep from * once; sc in corner st, **ch 2, drop the lp and pick it up from the corresponding corner lp of completed square, ch 3, sc once more into corner st of current square**, [ch 1, drop the lp and pick it up from the next lp of completed square, ch 2, sk the next 3 dc on current square, sc in sp before next dc of current square] 6 times working the last sc into the corner st instead of sp; rep bet ** ** once, ch 3, [sk next 3 dc, sc in sp before next dc, ch 3] 5 times; sk next 3 dc; join with sl st to first sc. FO.
Joining 2 Sides:
- Join CA to any corner st, ch 1, (sc, ch 5, sc) into corner st, ch 3, [sk next 3 dc, sc in spe before next dc, ch 3] 5 times, sk next 3 dc, sc in corner sp, *ch 2, drop the lp and pick it up from the corresponding corner lp of completed square, ch 3, sc once more into corner st of current square*, **[ch 1, drop the lp and pick it up from the next lp of completed square, ch 2, sk next 3 dc on current square, sc in sp before next dc of current square] 6 times working the last sc into the corner st instead of sp**; [ch 2, drop the lp and pick it up from the next corresponding corner lp of completed square] twice, ch 3, sc once more into corner st of current square; rep bet ** **, then rep bet * * once, ch 3, [sk next 3 dc, sc in sp before next dc, ch 3] 5 times; sk next 3 dc; join with sl st to first sc. FO.
Edging:
- Rnd 1: With RS facing, Join CA to any corner lp. Ch 1, *(sc, ch 3) twice in corner lp, (sc, ch 3) in next lp and in each lp up to the corner lp; rep from * around; join with sl st to first sc.
- Rnd 2: Join CB in corner ch-3 lp, ch 3 (counts as first dc), work another 6 dc in same corner lp, *3 dc in each lp up to next corner lp**, 7 dc in next corner lp; rep from * ending last rep at **; join with sl st to first dc.
- Rnd 3: Ch 1, sc in first st and in each st around working 2 sc into each corner st; join with sl st. FO.


lovely
Thanks :)
I was not able to download this pattern as my computer detected a threat. So – instead I cut and pasted to a word doc. Other than that – I can’t wait to try out this pattern. It looks to pretty.
Thank you for letting me know. Can you provide me with any details as to what the threat was? Any help would be appreciated.
I’m new here, have signed-up, still can’t copy and paste free patterns. I have a ton of experience doing that but I’ve been trying for hours and can’t make it happen [?] Anything should know?
Thanks! :-)
Hi, It was disabled due to copyright reasons, but it should work now to copy and paste. There’s always the green print friendly button too for easy saving and printing.
Thank you so much, I was going nuts ‘-)
Also, THANK YOU for sharing your talent, time and wonderful site!
Much appreciated!
How many skeins of each color?
I worked off of the big balls, so one ball for each color. That said, I did not use the entire balls… so couldn’t tell you exactly how much yardage.