
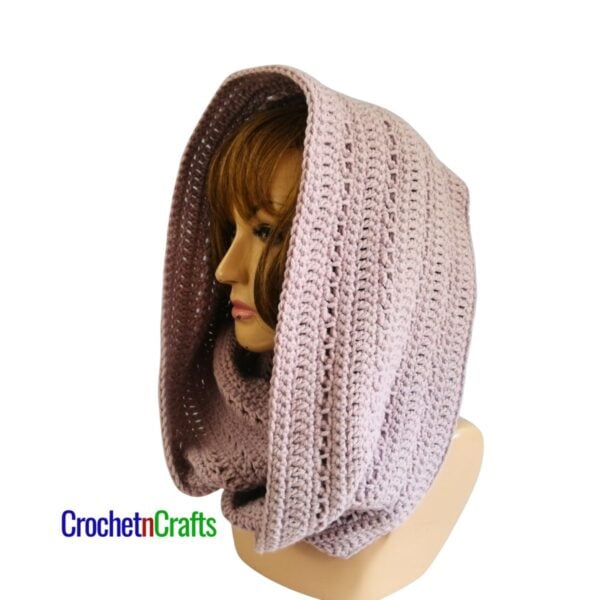
Yin and Yang Infinity Cowl
Not sure why, but this is my favorite cowl right now! It not only is huge, but I love the two-toned colors and the textures. And you can wear it as a regular cowl as well as a hood. I crocheted it around the Christmas holidays and it has kept me nice and toasty ever since. It’s funny how the weather dictates what you crochet. :) Anyhow, I hope that you will enjoy it too.

This pattern was named by Susan Mackie, who suggested “Yin and Yang”. Thank you so much Susan! I would have never thought about it, but it is a perfect match not only because of the colors, but because the two-toned texture as well.
It’s an infinity cowl. Which means you will have the right and wrong sides showing up on both sides. I thought it would look nice after I crocheted my In a Spiral Hat. It has a beautiful drape, which looks great as a hooded cowl or cozy around the neck.

The Yarn
Caron Simply Soft not only had the colors I needed, but it is a super soft, yet strong yarn. It was the perfect yarn for making this cowl. However, you can substitute with your favorite worsted weight yarn if you like.
Caron Simply Soft


How it’s Made
I worked the first round as a row. Instead of joining the beginning chains, start with an uneven amount of chains and crochet into the 2nd ch from hook and all the way across. Then make your twist in your work and join the two ends to create an infinity.
In rnd 2 you will work into both sides of rnd 1 with CB. The half twist creates a figure 8, which then allows for both sides to be worked. You begin in the free loops, then work your way around and continue working into the top of the stitches made in rnd 1. Thus, in rnd 2, you end up with twice as many sts as in rnd 1.
The stitch used to crochet this beauty is simply the crunch stitch! It’s beautiful as is, but when you work it with two colors, it’s even better!


Yin and Yang Infinity Cowl
Skill Level
Materials
- Yarn: Caron Simply Soft (2 Colors) Four 5oz balls – Or any worsted yarn.
- Crochet Hook: I/9-5.50mm
- Other: Measuring Tape, Scissors, Yarn Needle.
Measurements
- Gauge: 2" over 7 sts and 9 rows.
- Finished Size: Measures 10" high and 29" long when laying flat.
Abbreviations
- CA = Color A
- CB = Color B
- Ch/Chs = Chain/Chains
- FO = Fasten Off
- Hdc = Half Double Crochet
- Rep = Repeat
- Rnd/Rnds = Round/Rounds
- Sl St = Slip Stitch
- St/Sts = Stitch/Stitches
- Sthdc = Standing Half Double Crochet
- Crochet Abbreviations and Terms are in American.
Notes
- First St in the rnd is worked into the same st as where the join was made.
- Instead of fastening off, carry the yarn up after each rnd is completed.
Instructions
- With CA, Loosely ch 201, or any multiple of 2 + 1.
- Rnd 1: Hdc in 2nd ch from hook, *sl st in next ch, hdc in next ch; rep from * across, sl st in last ch.
- Make a twist in your work and join the top of last st made to free loop at bottom of first hdc. Then join the bottom of the last sl st to the top of first hdc. See images below. Do not FO, but carry the yarn up.

- Rnd 2: Join CB and start working into free lps of rnd 1, sl st into same free lp as where join was made, hdc in next free lp, *sl st in next free lp/st, hdc in next free lp/st; rep from * all the way around till you get back to your first sl st; join with sl st in both lps of first sl st. [400 sts]
- Note: Halfway through rnd 2 make sure to hdc into the free lp where last sl st was made in rnd 1. Also, you want to sk the turning ch.
- Rnd 3: With CA, ch 1, hdc in same st as join, sl st in next st, *hdc in next sl st, sl st in next hdc; rep from * around; join with sl st in first hdc. [400 sts]
- Rnd 4: With CB, sl st in same st as join, hdc in next st, *sl st in next hdc, hdc in next sl st; rep from * around; join with sl st in first sl st. [400 sts]
- Rnds 5-22): Continue with Rnds 3-4 until you have reached a desired height ending with CA. FO.


Beautiful cowl but the way the pattern is writtern is totally confusing.
Perhaps it might help if I did the photos in the same colors as was used in the pattern? Let me know what part in specific you’re having trouble with and I’ll see if I can help you.
Thanks so much,
rhelena
Do you maybe have a video tutorial?
Sorry Sheila, I don’t have one at this time.
It doesn’t look like 200 stitches. Maybe 20
Sorry it’s confusing. You are working on both sides of the chains, so your stitches within the rounds are double of what it looks like.
I’m a pretty experienced crocheter but just can’t follow this pattern. I’ve triednit several times and just can’t get it.
Linda, I’m going to try and put together a better photo tutorial. :)
Is there a better tutorial yet?
Felicia,
I’m sorry for taking so long, but I have finally updated the pattern page. The updated version is at the bottom. Let me know if it’s clearer and/or if you have any questions or suggestions.
Thanks.
Rhelena
Has anyone tried this or found a tutorial? I have someone who wants this and I’m making it as a gift for them and I’m like I’m having a hard te understanding this.
To be honest, I was apprehensive to even attempt to start this beautiful cowl at first. It does look complicated but once I got through the twist part (original version), I don’t know why I even doubted myself. So far, so good.! I am on my way to finishing this lovely cowl for my Mom. Thank you for this wonderful pattern!
Thank you. I’m so glad you were able to make this without problems. :)
Hello there in the original pattern for rows 5-22 it says repeat rows 2 and 3. What part of row 2 am i supposed to repeat? Between the second set of *
Do i work both sides throughout the whole pattern?