
Striped Slouchy Beanie Crochet Pattern
This striped slouchy beanie crochet pattern can be crocheted with one or more colors. I did mine in two, but it might also look good in a solid or as a stash-buster hat.

The slouchy beanie is turned at every round in order to bring out the beautiful texture of the crunch stitch. It is easy to crochet, and the texture makes this ideal for gifting and selling at craft fairs.
The Finished Size
The finished hat is 18″ in circumference by 11″ tall. The pattern is in a multiple of two, which makes it super easy to adjust to fit any head size. Refer to this Crochet Hat Size Chart by Age if you want to make this in other sizes as well.

The Yarn
I used Caron Simply Soft, a medium #4 worsted weight yarn. It works well with a 5.5 mm crochet hook to give you a nice drape.
Feel free to choose your favorite worsted weight yarn to make this.

Caron Simply Soft


How It’s Made – The Crunch Stitch with Stripes
The pattern is started at the ribbing rows. The ribbing is made simply by crocheting into the back loops.

You can adjust the width of the ribbing simply by increasing or decreasing your starting chains.
Continue to work the ribbing rows until you have reached a desired circumference. Just make sure to end with a multiple of two to accommodate the stitch pattern used for the body.
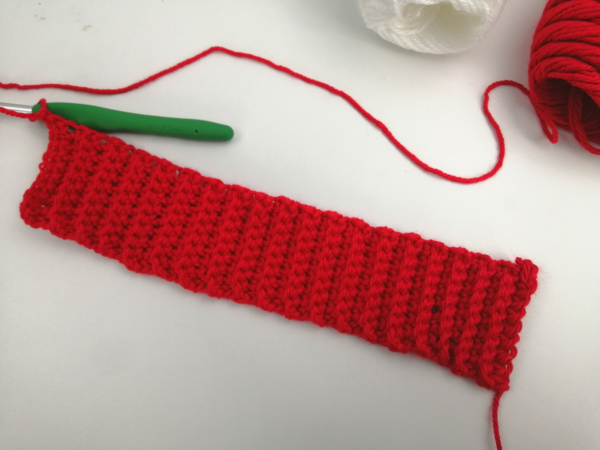
Then bring the two ends together. Chain 1 and join by slip stitching across.

Flip your work so the seam falls on the inside. Then begin working in the round.

Each row end counts as one stitch. Work a half double crochet into the first end. Then slip stitch into the next row end. Repeat around, and join with a slip stitch. Turn.

After two rounds, change to the next color. For this pattern, it looks best to work the first round of the new color from the right side. So the color changes are done from the Wrong Side.
So to do the color change, bring the old color to the front or the “Wrong Side” of the fabric as shown.

Then bring in the next color from the Wrong Side as well, as shown.

Insert your hook in the first stitch of the round. Wrap the new color over and pull through to complete the join and color change.

I always get a big loop on the old color. Pull the old yarn to pull it tight.

Chain 1 and turn your work. Half double crochet into the first slip stitch.

Then slip stitch into the next half double crochet. Repeat around.


Striped Slouchy Beanie Crochet Pattern
Skill Level
Materials
- Yarn: Caron Simply Soft (Worsted Weight, #4; 100% acrylic; 6 oz/170.1g; 315yds/288m) 2 colors.
- Crochet Hook: I/9-5.50mm
- Other: Measuring Tape, Scissors, Yarn Needle.
Measurements
- Gauge: 14 sts = 4".
- Finished Size: 18" in circumference by 11" tall. Can be modified to any size needed.
Abbreviations
- CA = Color A = Red
- CB = Color B = White
- Bls = Back Loops
- Ch/Chs = Chain/Chains
- Hdc = Half Double Crochet
- Hk = Hook
- Lp/Lps = Loop/Loops
- Rep = Repeat
- Rnd/Rnds = Round/Rounds
- Sc = Single Crochet
- Sk = Skip
- Sl St = Slip Stitch
- St/Sts = Stitch/Stitches
- Crochet Abbreviations explained in more details.
Notes
- Each end of ribbing row equals 1 st.
- Turn after each round.
- Colors are changed after every two rounds at the joining slip stitch.
- To change color, finish the round as instructed, but without making the join. Insert your hook into the first stitch made in the round; pick up the new color and pull through the stitch as well as the loop on your hook.
- The color changes are made from the Wrong Side. This requires you bring the old yarn to the front (wrong side) before making the color change. See photo tutorial above for step-by-step instructions on how I made my color changes.
Pattern Instructions
Brim
- Row 1: With CA, ch 10, sc in second ch from hk and into next 8 chs. Turn. [9 sc]
- Rows 2-64: Working in bls only, ch 1, sc in first st and into each st across. Turn. [9 sts] Continue with this row until you have reached a desired circumference making sure to end in an even number of rows.
- Ch 1 and join the ribbing rows by slip stitching the last row to the free lps of starting chs.
Working in the Round (Body of Hat)
- Rnd 1: (RS) With CA and working along the ribbing edge, ch 1, hdc in first st, sl st in next st, *hdc in next st, sl st in next st; rep from * around; join with sl st in first hdc. Turn [64 sts]
- Rnd 2: (WS) Ch 1, hdc in first sl st, sl st in next hdc, *hdc in next sl st, sl st in next hdc; rep from * around; join with sl st in first hdc. Turn [64 sts]
- Rnds 3-4: With CB, rep Rnd 2.
- Rnds 5-6: With CA, rep Rnd 2.
- Rnds 7-40: Rep rnds 3-6 changing the color after every two rnds.
- Rnd 41: With CA, ch 1, hdc in same st as join, *sk next st, hdc in next st; rep from * around; join with sl st in first st. [32 sts]
- Rnd 42: Ch 1, sc2tog around; join with sl st in first st. [16 sts]
- Fasten off leaving a 10" tail for sewing the top closed.



You mention a pink and black hat but I don’t see a picture of that; only the black & gray hat. Could you post a pic of the pink and black one?
Hi, sorry, I’m not sure why I removed it from the post, but I’ve added it again.