Crunch Stitch Crochet Mug Cozy Pattern
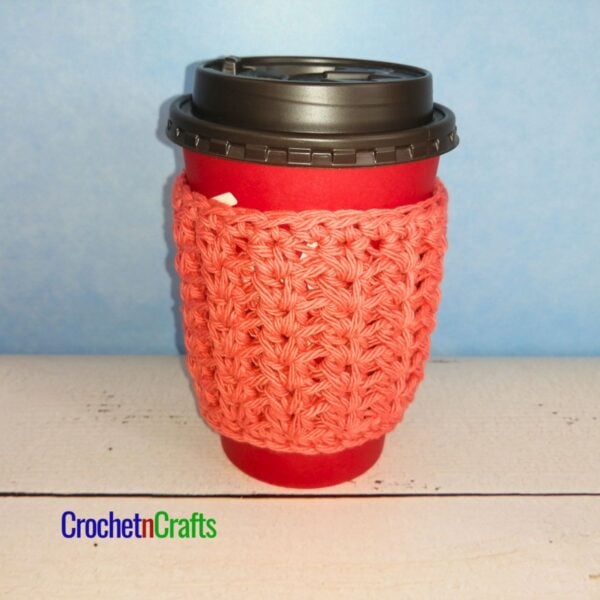
Here is another free crochet pattern for a mug cozy. It’s actually a coaster/cozy in one – it protects your tables while keeping our coffee or tea nice and warm. It’s only one layer of fabric around the cup, but believe it or not, it really does make a difference.

To keep it on secure, I crocheted up a button to hold the top part of it together. But you can use any kind of button that you like or have on hand.
The Yarn
Choose a cotton yarn, such as Bernat Handicrafter cotton or anything similar. The yarn is not only heat resistant, but it also helps to absorb any spills and drips that might occur.
Bernat Handicrafter Cotton


The Pattern
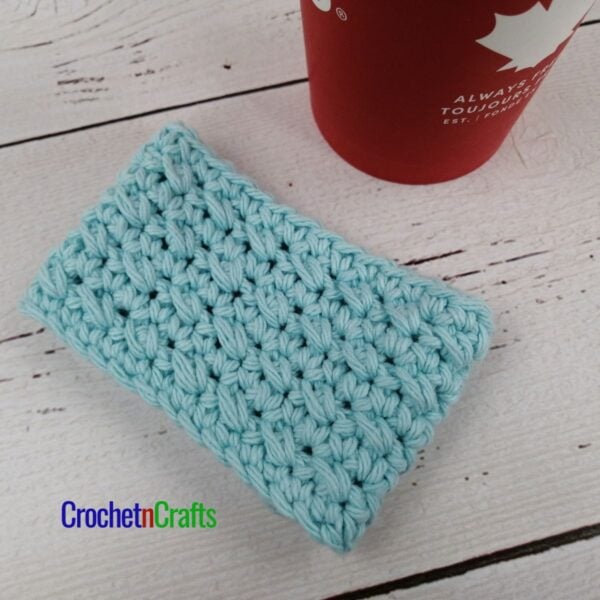
I used the crunch stitch for this cozy pattern, and it resulted in a very nice texture. The crunch stitch is basically like the seed stitch, only you work it with the half double crochet and slip stitches. It’s a very easy, yet a pretty stitch to work with.
The mug cozy pattern is started at the bottom, which acts as a coaster under the top. This part is worked in rounds until you reach the diameter needed. Then begin working in rows to leave room for the mug handle.


Crunch Stitch Crochet Mug Cozy Pattern
Skill Level
Materials
- Yarn: Bernat Handicrafter Cotton #4 worsted weight cotton.
- Crochet Hooks: H/8-5.00mm & G/6-4.25mm
- Other: Scissors, Stitch Marker, Yarn Needle.
Measurements
- Gauge: Measures 2" across first 3 rounds.
- Finished Size Fits a 3.25" diameter mug.
Abbreviations
- Ch/Chs = Chain/Chains
- FO = Fasten Off
- Hdc = Half Double Crochet
- Hk = Hook
- Rnd/Rnds = Round/Rounds
- Sc = Single Crochet
- Sl St = Slip Stitch
- St/Sts = Stitch/Stitches
- Crochet Abbreviations and Terms are in American.
Helpful Links
Instructions
- Rnd 1: With H/8-5.00mm hk, Ch 2, work 8 sc into 2nd ch from hk; do not join but continue to work in a continuous rnd. Place st marker in last st made of each rnd in order to keep track. (8 sts)
- Rnd 2: Work 2 sc in each st around. (16 sts)
- Rnd 3: (Sc in next st, 2 sc in next st) around. (24 sts)
- Rnd 4: (Sc in next 2 sts, 2 sc in next st) around. (32 sts)
- Rnd 5: (Sc in next 3 sts, 2 sc in next st) around. (40 sts)
- Rnd 6: Sc in each st around. Do Not Turn.
Begin Working in Rows
- Row 1: Sl st into next 2 sts, ch 1, sc in next st, (sl st into next st, hdc in next st) to last sc, sc in last sc. Turn. (38 sts not counting the first 2 sl sts as they will not be worked into.)
- Row 2: Ch 1, sc in first sc, (sl st into next hdc, hdc in next sl st) to last sc, sc in last sc. Turn. (38 sts)
- Rep row 2 until you have reached a desired height. I did 14 rows for mine. Do not fasten off. Ch 10, sl st into last st made to form loop for button. FO.
Button:
- Rnd 1: With G/6-4.25mm hk, Ch 2, work 8 sc into 2nd ch from hk, place st marker in last st made.
- Rnd 2: Work 1 sc in each st around.
- Rnd 3: Encase rnd 2 by working 1 sc into each st of rnd 1. FO leaving a long tail for sewing. Weave the tail end through the sts of rnd 3.
- Pull the tail tight and sew button onto top corner opposite from the loop as pictured below.