
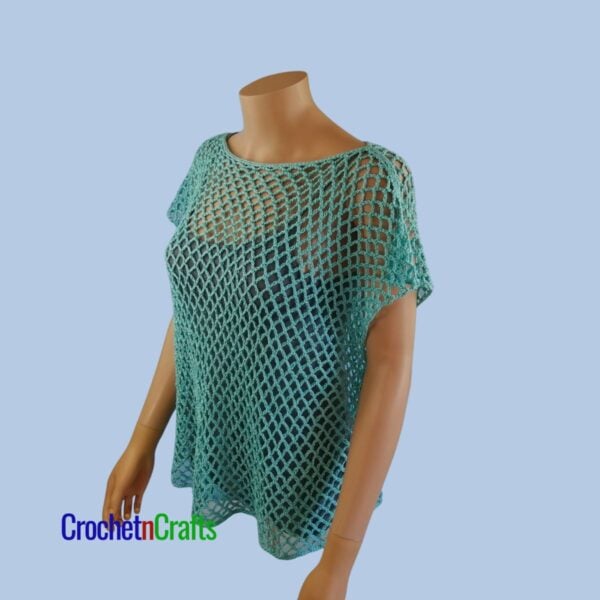
Pretty Simple Crochet Shrug Pattern


The pretty simple shrug pattern works up quickly and easily and is perfect for layering throughout the seasons.
With its open-front design, this shrug is easy to slip on, making it a must-have for spring and fall weather. In the summer, it’s the perfect lightweight layer for outdoor events when cooler weather can hit unexpectedly. The crochet shrug is versatile and stylish, and pairs with just about anything from a dress to a simple t-shirt and jeans.
Although given in only five women’s sizes, a stitch multiple and sizing notes are included to make this a custom size from child to adult sizes.


Get Your Print-Friendly PDF. Shop Etsy & Save 25% with coupon code: CNC25
Also Available in the Following Bundle:


Subscribe for Free Crochet Patterns, Coupons, and Other Crafty Promotions.
You will also receive a PDF copy of the Simple Summer Poncho pattern.
Your email will not be shared. Unsubscribe any time. By subscribing, you agree to our privacy policy and terms of use.
Pretty Simple Crochet Shrug Pattern
The stitch used for this handmade shrug is the closed half double crochet v-stitch. The stitch is super easy and mindless to work on, making it great for crocheters of all skill levels, including brave beginners.
Skill Level: Easy
Materials
- Yarn: Caron Cotton Cakes (Medium, #4; 60% Cotton, 40% Acrylic; 250g/8.8oz; 530yds/485m) Color: Seashell – 2, (2, 2, 3, 3) balls.
- Crochet Hook: H/8-5.00mm
- Other: Measuring Tape, Scissors, Yarn Needle, Stitch Markers.
Measurements
- Gauge: 6 v-sts and 11 rows = 4″.
Finished Sizes: XS, (S, M, L, XL) - To Fit Bust Circumference: 28″, (32″, 36″, 40″, 44″)
- The small is shown on a 33″ mannequin.
Abbreviations
- Ch/Chs = Chain/Chains
- FO = Fasten Off
- Hdc = Half Double Crochet
- Rep = Repeat
- Rs = Right Side
- Sk = Skip
- St/Sts = Stitch/Stitches
- V-st/sts = V-Stitch/Stitches
- Ws = Wrong Side
Notes
I chose a self-striping yarn. I love how it turned out, except the colors don’t line up at the seam. It’s growing on me, but if I had to do it over again, I would cut the colors in the self-striping yarn, or use other yarn colors, and then plan it so everything lines up.
To change colors: Work the last stitch in the previous row as normal until the last step and you have three loops left on the hook; drop the old color, pick up the new color, and draw through all loops to complete the stitch.
Substituting with a different yarn: Choose a soft yarn that drapes well. Also, I found going up a hook size helps to give this stitch a lacier look and a softer drape.
Sizing Notes
The sleeves of this shrug are designed to fall at the elbows. This gives you some coverage at the front. For more coverage and longer sleeves, simply increase the starting chains in the multiple provided.
Taking Measurements: With arms stretched out at the sides, measure the distance from one arm to the next between the points of where you want the sleeves to fall. For elbow length, measure from elbow to elbow. For wrist length, measure from wrist to wrist, etc.
For an oversized shrug, measure from wrist to wrist, then increase the length as desired by doing more repeats of the pattern row.
Instructions are written for XS, with instructions for (S, M, L & XL) in parentheses.
Special Stitch Instructions
V-Stitch (v-st): 2 hdc in same ch or st. When you work a v-st into another v-st, work the v-st in between the 2 hdc that make up the v-st. Stitch Tutorial – Working in Rows and in Rounds.
Pretty Simple Crochet Shrug Pattern Instructions
Leaving a 30″ tail, Ch 97, (103, 109, 115, 121), or any multiple of 2 + 1 to obtain the width you need.
Row 1 (WS): Hdc in 2nd ch from hk, hdc in next ch, *sk next ch, v-st in next ch; rep from * across to last 2 chs; hdc in last 2 chs. Turn. [4 hdc and 46, (49, 52, 55, 58) v-sts]
Row 2 (RS): Ch 1, hdc in first 2 hdc, v-st in next v-st and into each v-st across; hdc in last 2 hdc. Turn. [4 hdc and 46, (49, 52, 55, 58) v-sts]
Rows: 3-76, (76, 78, 80, 80): Rep Row 2. FO leaving a 30″ tail.
To Sew the Shrug
Block the shrug to the dimensions in the schematic.

Fold the shrug in half with the right sides facing outward so that the last row lines up with the first.
Using the tail ends and starting from the outside edge where the first and last rows come together, sew the seam along each side using the mattress stitch, leaving a 6 (6.5, 7, 7.5, 8)” opening for each arm.

More Free Crochet Patterns


Pretty Simple Crochet Patterns
See More Closed HDC V-St Crochet Patterns.


Shawl Crochet Patterns
See More Crochet Shawl Patterns.


