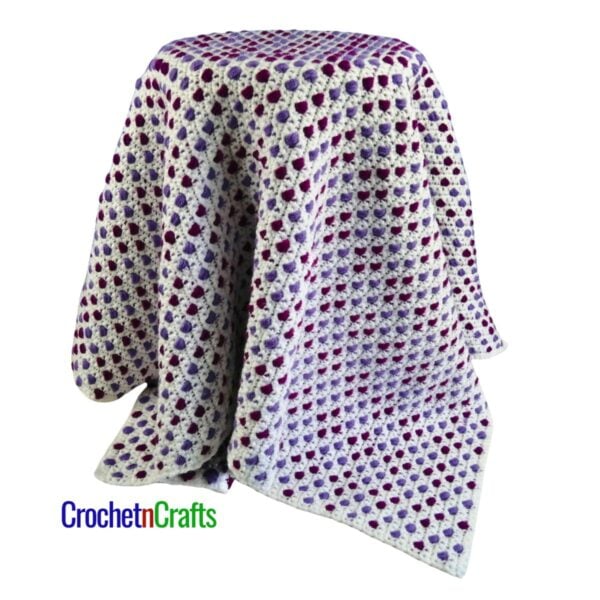
Fall Flowers – Crochet Fall Blanket
Make this crochet fall blanket in your favorite fall colors, or any colors that you like, from cheerful spring and summer colors to holiday colors, or to match your home decor.
This free crochet pattern is great for cleaning up your yarn stash because you can crochet each square up in a different color if you like. I did mine all the same, but there are many color combinations that you could try for a unique blanket.
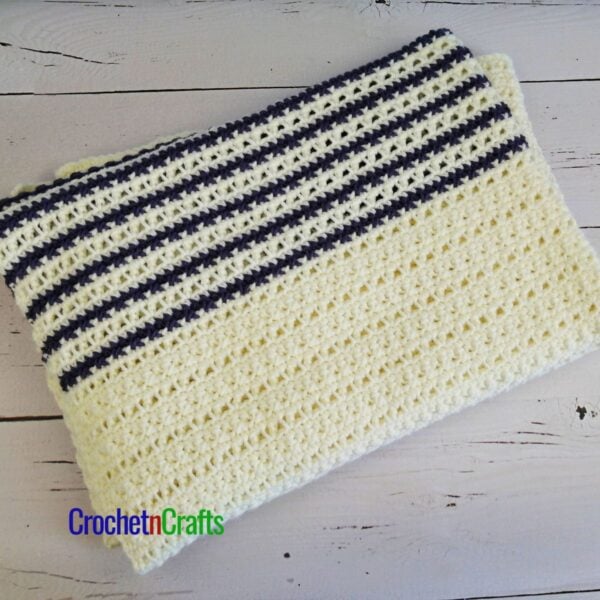
Another awesome fall blanket is this fall striped blanket pattern, which can be modified for any season or home decor. While not shown in fall colors, this ball stitch crochet blanket pattern would look lovely in shades of orange and red with a light brown background.


Subscribe for Free Crochet Patterns, Coupons, and Other Crafty Promotions.
You will also receive a PDF copy of the Chunky Crochet Lapghan pattern.
Your email will not be shared. Unsubscribe any time. By subscribing, you agree to our privacy policy and terms of use.
Fall Flowers Crochet Blanket – Pattern Information
This crochet blanket pattern is crocheted up using squares with a pretty flower in the middle.
The squares are joined using the flat braid, which is slightly more time-consuming. It requires that you drop the active loop and pick it up again from the corresponding loop on the finished square to join the squares. This method creates a nice lacy joining round, thus making the extra efforts well worth it.
You can join the squares as you go, or you can crochet them all up first. I found that joining each square as I finished it required frequent color changes. So I ended up making the squares one color at a time and then joining them. At this point, I realized how time-consuming it is to join the squares.
Skill Level: Intermediate
Materials
- Yarn: Red Heart Soft Touch Or any medium-weight acrylic yarn.
- 5 Colors: Color A, (CA): Yellow for Center (1 ball)
- Color B, (CB): Orange for Raised Petals (3 balls)
- Color C, (CC): Red for Back Petals (5 balls)
- Color D, (CD): Green for Leaves (5 balls)
- Color E, (CE): Brown for Joining (4 balls)
- Crochet Hook: G/4.25MM or any hook suitable for yarn.
- Other: Scissors, Yarn Needle.
I used a worsted-weight yarn called Red Heart Soft Touch. It is super soft, but it does make for a heavy blanket. I love heavy blankets because I find them to be cozier!
You can substitute any yarn that you like, including scrap yarns, as long as you stick with the same yarn throughout the blanket.
Measurements + Size Chart
The finished measurements are 60×75 inches. I used 238 squares to make this afghan.
You can crochet this to any size that you want. If you would like a different size, refer to this blanket size chart.

Abbreviations
- Ch/Chs = Chain/Chains
- Dc = Double Crochet
- FO = Fasten Off
- Lp/Lps = Loop/Loops
- Rep = Repeat
- Rnd/Rnds = Round/Rounds
- Sc = Single Crochet
- Sk = Skip
- Sl St = Slip Stitch
- Sp/Sps = Space/Spaces
- St/Sts = Stitch/Stitches
- Tr = Triple Crochet
Notes
Join the new color in the joining slip stitch of the previous round.
Or, fasten off each color and then join the new color with a standing crochet stitch.
Helpful Links
Fall Crochet Blanket Pattern Instructions
Rnd 1: With CA, work 8 sc into a magic ring; join with sl st in first sc. [8 sc sts]
Rnd 2: Join CB, ch 1, (sc, ch 3) in same st as join, *sk next st, (sc, ch 3) in next st, rep from * around to last st, sk last st; join with sl st in first sc. [4 ch-3 sps]
Rnd 3: Ch 1, sc in same st as join, *working in front of ch-3 sp, 5 dc into skipped st of Rnd 1**, sc in next sc in Rnd 2; rep from * around, ending last rep at **, join with sl st in first sc. [4 sc and 20 dc]
Rnd 4: Join CC, ch 1, sc in same st as join, *working in the back of Rnd 3 (dc, 5 tr, dc) into ch-3 sp made in Rnd 2,** sc in next sc in Rnd 3; rep from * around, ending last rep at **; join with sl st in first sc. [4 sc, 8 dc, 20 tr]
Rnd 5: Join CD, ch 4 (counts as first tr), work another 6 tr in same st as join, *ch 1, sk next 3 sts, sc in next st, ch 1, sk next 3 sts,** 7 tr in next sc; rep from * around ending last rep at **, join with sl st in first tr. Fasten Off. [4 sc, 28 tr]
Joining Squares with the Flat Braid Join
The joining method used in this pattern is called the “flat braid”, and it creates a nice lacy joining round.
To sum it up, the first square is worked with a sc, ch 3, skip 1 pattern. The corners are worked with a sc, ch 4, sc, to create a slightly large loop.
When joining the next square, you basically work a sc, ch 2, drop the loop and pick it up from the corresponding loop of the completed square; ch 1, sk 1 on the current square, and repeat. As for corners, you sc, ch 2, pick up the loop from the corresponding corner, ch 2, and sc back into the current square.
Where two sides are joined, the corner is worked as follows: sc in the corner of the current square, ch 2, pick up the loop from the first corresponding corner, ch 2, pick up the loop from the corner of the next completed square, ch 2, sc back into the current square.
Below is a step-by-step description.
First Square
Sk st where join was made, join CE with a standing sc to next st of Rnd 5; ch 3; *sk next st, (sc, ch 4, sc, ch 3) in next st, sk next st, (sc, ch 3) in next st, [sk next st, (sc, ch 3) in next ch-1 sp] twice, sk next st,** (sc, ch 3) in next st; rep from * around ending last rep at **, join with sl st. Fasten Off.
Second and Third Squares, or Joining 1 Side of Current Square:
Sk st where join as made, join CE with a standing sc to next st of Rnd 5; ch 3, sk next st, sc in next st, **ch 2, drop the lp and pick it up from the corresponding corner sp of completed square, ch 2, sc into same st of current square**, *ch 2, drop the lp and pick it up from the next ch-3 sp of completed square, ch 1, sk next st on current square, sc in next st*, [ch 2, drop the lp and pick it up from the next ch-3 sp of completed square, ch 1, sk next st on current square, sc in next ch-1 sp] twice; rep from * to * twice; then rep from ** to ** once (one side is joined), working on current square, ch 3, ***sk next st, (sc, ch 3) in next st, [sk next st, (sc, ch 3) in next ch-1 sp] twice, sk next st****, (sc, ch 3) in next st, sk next st, (sc, ch 4, sc, ch 3) in next st; rep from *** around ending last rep at ****, join with sl st. FO.
Joining 2 Sides of Current Square:
Sk st where join as made, join CE with a standing sc to next st of Rnd 5; ch 3, sk next st, sc in next st, **ch 2, drop the lp and pick it up from the corresponding corner sp of completed square, ch 2, sc into same st of current square**, *ch 2, drop the lp and pick it up from the next ch-3 sp of completed square, ch 1, sk next st on current square, sc in next st*, [ch 2, drop the lp and pick it up from the next ch-3 sp of completed square, ch 1, sk next st on current square, sc in next ch-1 sp] twice; rep from * to * twice***; [ch 2, drop the lp and pick it up from the next corresponding corner sp of completed square] twice, ch 2, sc into same st of current square, rep from first * to *** once, then rep from ** to ** once; (two sides are joined). Working on current square, ch 3, ****sk next st, (sc, ch 3) in next st, [sk next st, (sc, ch 3) in next ch-1 sp] twice, sk next st****, (sc, ch 3) in next st, sk next st, (sc, ch 4, sc, ch 3) in next st, rep from **** to ****; join with sl st in first sc. FO.
Edging
Rnd 1: Join CE to any sp along the edge, *ch 4, drop the lp and pick it up from the next lp, rep from * around, join with sl st into the first sp.
Rnd 2: Ch 1, sc in same sp, ch 3, *sc in next sp, ch 3, rep from * around, join with sl st. Fasten off.
Tips:
When joining 2 or more squares the dropped lp is picked up from the indicated corresponding sp of the completed square. The hook is inserted from the top (right side) of the completed square in order to pull the active lp on the current square through from the wrong side. Always start the joining at a corner. See images below.


The corner stitch completed.

One side joined.

Two squares joined to the first one.

When joining at a corner where 3 corners have already been joined, pick up the lp from the first corresponding corner sp, ch 2, drop the lp once more, and pick it up from the corner sp of the left square. (The corner sp of the square to which you will join the next side of the current square.) See images below.


Corner completed.


Crochet Blanket Patterns
See All Crochet Blanket Patterns.