Blossom Stitch Crochet Twisted Headband
This crochet twisted headband pattern is perfect for spring or fall weather when it’s cold, but not too cold! It is a nice alternative to a hat, and can be worn to hold the hair back or to keep your ears and forehead nice and cozy!
This crochet headband pattern can be worked up in a small amount of yarn, which makes it an ideal pattern for stashbusting. Plus, the size is adjustable, making it easy to make up a whole bunch for gifts.
This free crochet pattern is also available in a paid pdf. Shop Etsy & Save 25% with coupon code: CNC25

Subscribe for Free Crochet Patterns, Coupons, and Other Crafty Promotions.
You will also receive a PDF copy of the Seeded Lace PDF pattern bundle.
Your email will not be shared. Unsubscribe any time. By subscribing you agree to our privacy policy and terms of use.
Crochet Twisted Headband – Pattern Information
The stitch used here is the Crochet Blossom Stitch. It has a bit of an open lace. The pattern uses basic crochet stitches and can be replicated by beginners who are comfortable with the basics and know how to read a pattern.
It is worked in rows to the size you want, and then the ends are sewn together to make the twist.
Skill Level: Easy
Materials
- Yarn: Bernat Premium (Worsted Weight, #4; 100% Acrylic; 7oz/198g; 360yds/329m) Color: Coral Peach, 1 ball
- Crochet Hook Size: I 5.50mm
- Other: Measuring Tape, Scissors, Yarn Needle.
I used Bernat Premium yarn with a 5.5 mm crochet hook. It’s a worsted weight acrylic yarn. Any similar yarn that gives you a good stretch can be substituted. Vanna’s Choice is a good alternative for this band.
Measurements
- Gauge: 10 sts = 3″.
- Finished Size: 11″ across by 4″ wide.
The finished size is shown on an adult small, but in a mutliple of 4 + 2 you can easily customize this for any size you need! If you need to make adjustments, you can use this ear warmer size chart as a reference.
Abbreviations
- Ch/Chs = Chain/Chains
- Dc = Double Crochet
- Rep = Repeat
- RS = Right Side
- Sc = Single Crochet
- Sk = Skip
- Sp/Sps = Space/Spaces
- St/Sts = Stitch/Stitches
- V-St = V Stitch
- Crochet Abbreviations
Special Stitch Instructions
- V-St: (dc, ch 1, dc) in designated chain or space.
- Blossom Stitch Tutorial
Helpful Links
Crochet Twisted Headband Pattern Instructions
Ch 78, or any multiple of 4 + 2 to get the desired circumference.
Row 1: Working into back bumps, sc in 2nd ch from hook and into each ch across. Turn. [77 sts]
Row 2: Ch 1, sc in first st and into each st across. Turn. [77 sts]
Row 3: (RS): Ch 1, sc in first st, *sk next st, V-st in next st, sk next st; sc in next st; rep from * across. Turn. [19 V-sts]
Row 4: Ch 4 (counts as first dc and ch-1 sp), (sc, ch 1) in first v-st, *(dc, ch 1) in next sc, (sc, ch 1) in next v-st; rep from * across to last sc, dc in last sc. Turn. [38 ch-1 sps]
Row 5: Ch 1, sc in first dc, *v-st in next sc, sc in next dc; rep from * across. Turn. [19 V-sts]
Rows 6-9: Rep Rows 4 & 5.
Row 10: Ch 1, sc in first st and into each ch and st across. Turn. [77 sts]
Row 11: Rep Row 2. Fasten Off leaving a 10″ tail end for sewing the ends.
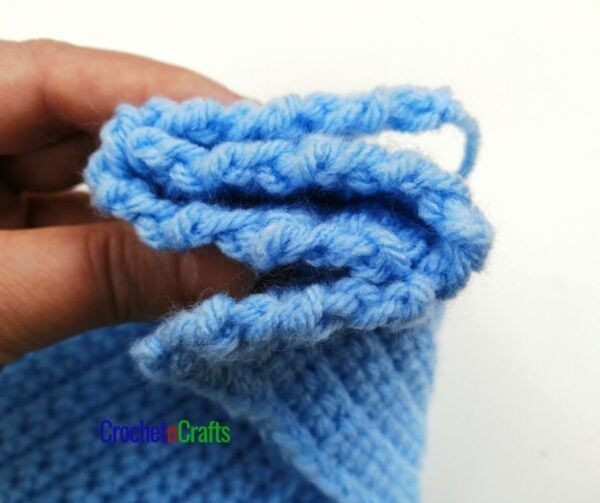
Fold your ends together with the wrong sides facing out. Sew together.
How To Sew a Twisted Headband Together

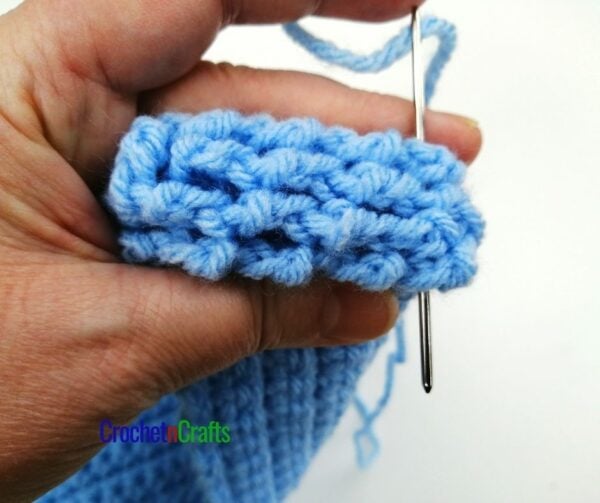
To sew the twist, fold the band lengthwise with the Wrong Sides facing the outside.

With your tail end of the yarn, sew across making sure to go through all four layers.

Turn right side out to hide the seam.
You Might Also Like
Crochet Ear Warmers
See More Crochet Ear Warmer Patterns.
Blossom Stitch Patterns
See More Blossom Stitch Crochet Patterns.


