
Blossom Stitch Hooded Cowl Scarf Crochet Pattern

The blossom stitch hooded cowl scarf crochet pattern is the perfect addition to your winter wardrobe. It is given in a small size for adults, but you can easily adjust both the width and length as needed. Thus, you can use this pattern to whip up a small cowl for a toddler or to make an oversized cowl for adults.
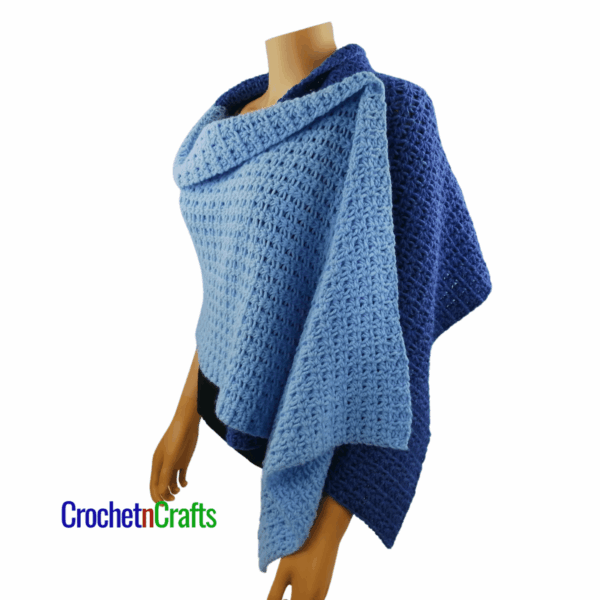
Depending on how long you make it, you can wear it as a scarf or as a cozy neck cowl over a big winter jacket. In transitional weather, it might be all you need with a sweater as an extra layer of warmth.
Another option is to wear it over the head as a hooded scarf. I made my cowl rather wide because I plan on wearing it as a hood. If you want to just wear it as a regular cowl or scarf, then you can reduce the width if you like.
This hooded cowl pattern is a mindless free crochet pattern and makes for a great gift idea during the cold winter months.
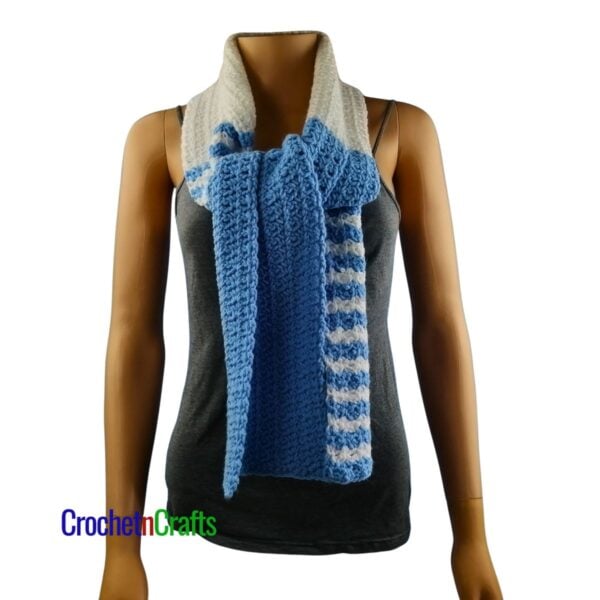
It is shown in a solid color, but don’t be afraid to experiment with colors. You can add stripes throughout or just a few stripes along what edges if you like. Or, do a color block!


This free crochet pattern is also available in a paid pdf. Shop Etsy & Save 25% with coupon code: CNC25


Subscribe for Free Crochet Patterns, Coupons, and Other Crafty Promotions.
You will also receive a PDF copy of the Seeded Lace PDF pattern bundle.
Your email will not be shared. Unsubscribe any time. By subscribing, you agree to our privacy policy and terms of use.
Cowl Scarf Crochet Pattern Information
Materials
- Yarn: Lion Brand Yarns – Pound Of Love (Medium, #4; 100% Acrylic; 1020yds/932m; 16oz./454g) Color: Oxford Grey, 1 ball
- Hook Size: J 6.00mm
Measurements
- Gauge: 13 sts/chs = 4″
- Finished Size: 60″ circumference by 11″ wide. Note: It is a snug fit if used as a hooded cowl. Increase the Foundation round in multiples of 4 if you want it to be looser.
Displayed here on a small adult mannequin without hair, it appears a bit roomier than it actually is. This hooded cowl is more of an XS-adult/teen/tween size. It feels cozy around my neck, effectively keeping out drafts. However, if you prefer a looser fit, you may need to add 20 to 60 stitches, depending on your size and how loose you like your cowls.
Abbreviations
- Ch/Chs = Chain/Chains
- Dc = Double Crochet
- Fsc = Foundation Single Crochet
- Rep = Repeat
- Sc = Single Crochet
- Sk = Skip
- Sl St = Slip Stitch
- Sp/Sps = Space/Spaces
- St/Sts = Stitch/Stitches
- V-St = V Stitch
Special Stitch Instructions
- V-St: (dc, ch 1, dc) in designated chain or space.
Hooded Cowl Scarf Crochet Pattern
Rnd 1: Fsc 200, or any multiple of 4, join with sl st in first st being careful not to twist.
Rnd 2: Ch 1, sc in same st as join, *sk next st, v-st in next st, sk next st**, sc in next st; rep from * around ending last rep at **; join with sl st in first sc. [50 v-sts and 50 sc]
Rnd 3: Ch 4 (counts as first dc and ch-1 sp), *(sc, ch 1) in v-st**, (dc, ch 1) in next sc; rep from * around ending last rep at **; join with sl st in first dc. [100 sts and 100 ch-1 sps]
Rnd 4: Ch 1, sc in same st as join, *v-st in next sc**, sc in next dc; rep from * around ending last rep at **; join with sl st in first sc. [50 v-sts and 50 sc]
Rnds 5-29: Rep rnds 3 and 4 until you have reached a desired width making sure to end with rnd 3.
Rnd 30: Ch 1, sc in same st as join and into each st and ch around; join with sl st in first sc. Fasten Off.
crochetpatternbonanza.com
Blossom Stitch Photo Tutorial
The stitch pattern for this infinity scarf consists of a v-stitch mixed in with single crochets, double crochets and chain 1 spaces. It is called the blossom stitch and is easy and mindless to work on once you get the pattern going.
The tutorial below shows how to work the blossom stitch in the round. I started the tutorial with a series of chains and worked single crochet stitches into those chains. Within the pattern above, the cowl pattern starts with a single crochet foundation. You can do either, however, the foundation single crochet, as above, will give you a stretchier edge.

Step 1
Chain any multiple of 4. Join the first and last chains with a slip stitch being careful not to twist the chains.

Step 2
Rnd 1: Chain 1.

Step 3
Single crochet into the same chain as join and into each chain around.
Note: I worked into the back bumps, but you don’t have to.

Step 4
Rnd 2: Chain 1. Single crochet into the same stitch as where the join was made.
Skip the next stitch.

Step 5
Double crochet into the next stitch.

Step 6
Chain 1.

Step 7
Double crochet again into the same stitch.
Skip the next stitch.

Step 8
Single crochet into the next stitch.

Step 9
Repeat around.

Step 10
Chain 4. Counts as first double crochet and chain 1 space.

Step 11
Single crochet into chain 1 space. Chain 1.

Step 12
Double crochet into the next single crochet. Chain 1.

Step 13
Repeat around. Join with a slip stitch in the third chain.

Step 14
Rnd 4: Chain 1. Single crochet into the same stitch as join.

Step 15
Double crochet, chain 1, double crochet into next single crochet.

Step 16
Single crochet into the next double crochet.

Step 17
Repeat around. Join with a slip stitch.
Rep Rnds 3 and 4 until you have the height that you want.

Step 18
Final Rnd: Chain 1, single crochet into each stitch and chain around.
Join with a slip stitch and fasten off.
Blossom Stitch Video Tutorial
This video shows how to make the blossom stitch in rows as well as in rounds.
You Might Also Like


Blossom Stitch Patterns
See More Blossom Stitch Crochet Patterns.


Lion Brand Pound of Love Patterns
See More Pound of Love Crochet Patterns.


Thank you so much.I am going to start today this pattern.🌹